外观
本指南演示了 LangGraph 的 Graph API 基础。它将带你了解状态,以及如何组合常见的图结构,例如序列、分支和循环。它还涵盖了 LangGraph 的控制功能,包括用于 map-reduce 工作流的 Send API,以及用于将状态更新与跨节点"跳转"相结合的 Command API。
安装
安装 langgraph:
bash
pip install -U langgraphbash
uv add langgraph安装 langgraph:
bash
npm install @langchain/langgraphTIP
设置 LangSmith 以获得更好的调试体验
注册 LangSmith 以快速发现并改进你的 LangGraph 项目的性能。LangSmith 让你可以使用追踪数据来调试、测试和监控用 LangGraph 构建的 LLM 应用——更多入门方法请参阅文档。
定义和更新状态
在这里,我们展示如何定义和更新 LangGraph 中的状态。我们将演示:
定义状态
LangGraph 中的状态可以是 TypedDict、Pydantic 模型或 dataclass。下面我们将使用 TypedDict。使用 Pydantic 的细节请参阅将 Pydantic 模型用于图状态。
LangGraph 中的状态使用 StateSchema 类定义。它提供了一个统一的 API,接受标准 schema(如 Zod)作为单个字段,同时接受像 ReducedValue、MessagesValue 和 UntrackedValue 这样的特殊值类型。
默认情况下,图的输入和输出 schema 相同,状态决定该 schema。如何定义不同的输入和输出 schema,请参阅定义输入和输出 schema。
让我们考虑一个使用消息的简单示例。这代表了许多 LLM 应用通用的状态表述方式。更多细节请参阅我们的概念页面。 让我们考虑一个使用消息的简单示例。这代表了许多 LLM 应用通用的状态表述方式。更多细节请参阅我们的概念页面。
python
from langchain.messages import AnyMessage
from typing_extensions import TypedDict

class State(TypedDict):
    messages: list[AnyMessage]
extra_field: int该状态跟踪消息对象列表,以及一个额外的整数字段。
typescript
import { StateSchema, MessagesValue } from "@langchain/langgraph";
import * as z from "zod";

const State = new StateSchema({
  messages: MessagesValue,
  extraField: z.number(),
});该状态跟踪消息对象列表,以及一个额外的整数字段。
更新状态
让我们构建一个包含单个节点的示例图。我们的节点只是一个读取图状态并对其进行更新的 Python 函数。此函数的第一个参数将始终是状态:
python
from langchain.messages import AIMessage

def node(state: State):
    messages = state["messages"]
    new_message = AIMessage("Hello!")
    return {"messages": messages + [new_message], "extra_field": 10}
该节点只是向我们的消息列表追加一条消息,并填充一个额外的字段。
让我们构建一个包含单个节点的示例图。我们的节点只是一个读取图状态并对其进行更新的 TypeScript 函数。此函数的第一个参数将始终是状态:
typescript
import { AIMessage } from "@langchain/core/messages";
import { GraphNode } from "@langchain/langgraph";

const node: GraphNode<typeof State> = (state) => {
  const messages = state.messages;
  const newMessage = new AIMessage("Hello!");
  return { messages: [newMessage], extraField: 10 };
};
该节点只是向我们的消息列表追加一条消息(reducer 负责拼接),并填充一个额外的字段。
WARNING
节点应直接返回对状态的更新,而不是就地修改状态。
接下来让我们定义一个包含该节点的简单图。我们使用 StateGraph 来定义一个在该状态上运行的图。然后使用 add_node 填充我们的图。
python
from langgraph.graph import StateGraph

builder = StateGraph(State)
builder.add_node(node)
builder.set_entry_point("node")
graph = builder.compile()
接下来让我们定义一个包含该节点的简单图。我们使用 StateGraph 来定义一个在该状态上运行的图。然后使用 addNode 填充我们的图。
typescript
import { StateGraph } from "@langchain/langgraph";

const graph = new StateGraph(State)
  .addNode("node", node)
  .addEdge("__start__", "node")
  .compile();
LangGraph 提供了内置的图可视化工具。让我们检查一下我们的图。可视化详情请参阅可视化你的图。
python
from IPython.display import Image, display

display(Image(graph.get_graph().draw_mermaid_png()))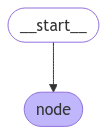
typescript
import * as fs from "node:fs/promises";

const drawableGraph = await graph.getGraphAsync();
const image = await drawableGraph.drawMermaidPng();
const imageBuffer = new Uint8Array(await image.arrayBuffer());

await fs.writeFile("graph.png", imageBuffer);
在本例中,我们的图只执行一个节点。让我们继续进行一个简单的调用:
python
from langchain.messages import HumanMessage

result = graph.invoke({"messages": [HumanMessage("Hi")]})
result
{'messages': [HumanMessage(content='Hi'), AIMessage(content='Hello!')], 'extra_field': 10}typescript
import { HumanMessage } from "@langchain/core/messages";

const result = await graph.invoke({ messages: [new HumanMessage("Hi")], extraField: 0 });
console.log(result);
{ messages: [HumanMessage { content: 'Hi' }, AIMessage { content: 'Hello!' }], extraField: 10 }请注意:
- 我们通过更新状态的单个键来启动调用。
- 我们会在调用结果中收到完整的状态。
为方便起见,我们经常通过 pretty-print 检查消息对象的内容:
python
for message in result["messages"]:
    message.pretty_print()
================================ Human Message ================================
Hi
================================== Ai Message ==================================
Hello!为方便起见,我们经常通过日志检查消息对象的内容:
typescript
for (const message of result.messages) {
  console.log(`${message.getType()}: ${message.content}`);
}
human: Hi
ai: Hello!使用 reducers 处理状态更新
状态中的每个键都可以有自己的独立 reducer 函数,用于控制节点的更新如何应用。如果没有显式指定 reducer 函数,则假定对该键的所有更新都应覆盖它。
对于 TypedDict 状态 schema,我们可以通过使用 reducer 函数注解状态的相应字段来定义 reducers。
在前面的示例中,我们的节点通过向 "messages" 键追加消息来更新状态中的该键。下面,我们为该键添加一个 reducer,使更新被自动追加:
python
from typing_extensions import Annotated

def add(left, right):
    """Can also import `add` from the `operator` built-in."""
    return left + right

class State(TypedDict):
    messages: Annotated[list[AnyMessage], add]
    extra_field: int
现在我们的节点可以简化了:
python
def node(state: State):
    new_message = AIMessage("Hello!")
    return {"messages": [new_message], "extra_field": 10}
在前面的示例中,我们使用了 MessagesValue,它已经内置了 reducer。对于自定义字段,你可以使用 ReducedValue 来定义更新的应用方式。
在前面的示例中,我们的节点通过向 "messages" 键追加消息来更新状态中的该键。MessagesValue reducer 会自动处理这一点:
typescript
import { StateSchema, MessagesValue, ReducedValue } from "@langchain/langgraph";
import * as z from "zod";

// MessagesValue 已经内置了 reducer
const State = new StateSchema({
  messages: MessagesValue,
  extraField: z.number(),
});
我们的节点只需返回新消息即可(reducer 负责拼接):
typescript
import { GraphNode } from "@langchain/langgraph";

const node: GraphNode<typeof State> = (state) => {
  const newMessage = new AIMessage("Hello!");
  return { messages: [newMessage], extraField: 10 };
};
python
from langgraph.graph import START

graph = StateGraph(State).add_node(node).add_edge(START, "node").compile()

result = graph.invoke({"messages": [HumanMessage("Hi")]})

for message in result["messages"]:
    message.pretty_print()
================================ Human Message ================================
Hi
================================== Ai Message ==================================
Hello!typescript
import { START } from "@langchain/langgraph";

const graph = new StateGraph(State)
  .addNode("node", node)
  .addEdge(START, "node")
  .compile();

const result = await graph.invoke({ messages: [new HumanMessage("Hi")] });

for (const message of result.messages) {
  console.log(`${message.getType()}: ${message.content}`);
}
human: Hi
ai: Hello!MessagesState
在实践中,更新消息列表还有一些额外的考虑因素:
LangGraph 包含一个内置 reducer add_messages,可以处理这些考虑因素:
python
from langgraph.graph.message import add_messages

class State(TypedDict):
    messages: Annotated[list[AnyMessage], add_messages]
    extra_field: int

def node(state: State):
    new_message = AIMessage("Hello!")
    return {"messages": [new_message], "extra_field": 10}

graph = StateGraph(State).add_node(node).set_entry_point("node").compile()
python
input_message = {"role": "user", "content": "Hi"}

result = graph.invoke({"messages": [input_message]})

for message in result["messages"]:
    message.pretty_print()
================================ Human Message ================================
Hi
================================== Ai Message ==================================
Hello!这是涉及对话模型的应用的一种通用状态表示方式。为方便起见,LangGraph 包含一个预构建的 MessagesState,因此我们可以有:
python
from langgraph.graph import MessagesState

class State(MessagesState):
    extra_field: int
MessagesValue
在实践中,更新消息列表还有一些额外的考虑因素:
LangGraph 包含内置的 MessagesValue,可以处理这些考虑因素:
typescript
import { StateSchema, StateGraph, MessagesValue, GraphNode, START } from "@langchain/langgraph";
import * as z from "zod";

const State = new StateSchema({
  messages: MessagesValue,
  extraField: z.number(),
});

const node: GraphNode<typeof State> = (state) => {
  const newMessage = new AIMessage("Hello!");
  return { messages: [newMessage], extraField: 10 };
};

const graph = new StateGraph(State)
  .addNode("node", node)
  .addEdge(START, "node")
  .compile();
typescript
const inputMessage = { role: "user", content: "Hi" };

const result = await graph.invoke({ messages: [inputMessage] });

for (const message of result.messages) {
  console.log(`${message.getType()}: ${message.content}`);
}
human: Hi
ai: Hello!这是涉及对话模型的应用的一种通用状态表示方式。为方便起见,LangGraph 包含预构建的 MessagesValue,因此我们可以有:
typescript
import { StateSchema, MessagesValue } from "@langchain/langgraph";
import * as z from "zod";

const State = new StateSchema({
  messages: MessagesValue,
  extraField: z.number(),
});
使用 Overwrite 绕过 reducers
在某些情况下,你可能希望绕过 reducer 并直接覆盖状态值。LangGraph 为此提供了 Overwrite 类型。当节点返回一个用 Overwrite 包装的值时,reducer 会被绕过,通道被直接设置为该值。
当你想重置或替换累积的状态,而不是与现有值合并时,这非常有用。
python
from langgraph.graph import StateGraph, START, END
from langgraph.types import Overwrite
from typing_extensions import Annotated, TypedDict
import operator

class State(TypedDict):
    messages: Annotated[list, operator.add]

def add_message(state: State):
    return {"messages": ["first message"]}

def replace_messages(state: State):
    # 绕过 reducer 并替换整个 messages 列表
    return {"messages": Overwrite(["replacement message"])}

builder = StateGraph(State)
builder.add_node("add_message", add_message)
builder.add_node("replace_messages", replace_messages)
builder.add_edge(START, "add_message")
builder.add_edge("add_message", "replace_messages")
builder.add_edge("replace_messages", END)

graph = builder.compile()

result = graph.invoke({"messages": ["initial"]})
print(result["messages"])
['replacement message']你也可以使用带有特殊键 "__overwrite__" 的 JSON 格式:
python
def replace_messages(state: State):
    return {"messages": {"__overwrite__": ["replacement message"]}}
WARNING
当节点并行执行时,在给定的超级步骤中,只能有一个节点对同一个状态键使用 Overwrite。如果多个节点尝试在同一个超级步骤中覆盖同一个键,将会抛出 InvalidUpdateError。
定义输入和输出 schema
默认情况下,StateGraph 使用单一 schema 运行,所有节点都应使用该 schema 进行通信。不过,也可以为图定义不同的输入和输出 schema。
当指定了不同的 schema 时,仍会使用内部 schema 进行节点间的通信。输入 schema 确保提供的输入符合预期的结构,而输出 schema 过滤内部数据,只根据定义的输出 schema 返回相关信息。
下面,我们将了解如何定义不同的输入和输出 schema。
python
from langgraph.graph import StateGraph, START, END
from typing_extensions import TypedDict

# 定义输入 schema
class InputState(TypedDict):
    question: str

# 定义输出 schema
class OutputState(TypedDict):
    answer: str

# 定义整体 schema,组合输入和输出
class OverallState(InputState, OutputState):
    pass

# 定义处理输入并生成答案的节点
def answer_node(state: InputState):
    # 示例答案和一个额外的键
    return {"answer": "bye", "question": state["question"]}

# 使用指定的输入和输出 schema 构建图
builder = StateGraph(OverallState, input_schema=InputState, output_schema=OutputState)
builder.add_node(answer_node)  # 添加答案节点
builder.add_edge(START, "answer_node")  # 定义起始边
builder.add_edge("answer_node", END)  # 定义结束边
graph = builder.compile()  # 编译图

# 用输入调用图并打印结果
print(graph.invoke({"question": "hi"}))
{'answer': 'bye'}typescript
import { StateGraph, StateSchema, GraphNode, START, END } from "@langchain/langgraph";
import * as z from "zod";

// 定义输入 schema
const InputState = new StateSchema({
  question: z.string(),
});

// 定义输出 schema
const OutputState = new StateSchema({
  answer: z.string(),
});

// 定义整体 schema,组合输入和输出
const OverallState = new StateSchema({
  question: z.string(),
  answer: z.string(),
});

// 定义处理输入的节点
const answerNode: GraphNode<typeof OverallState> = (state) => {
  // 示例答案和一个额外的键
  return { answer: "bye", question: state.question };
};

// 使用指定的输入和输出 schema 构建图
const graph = new StateGraph({
  input: InputState,
  output: OutputState,
  state: OverallState,
})
  .addNode("answerNode", answerNode)
  .addEdge(START, "answerNode")
  .addEdge("answerNode", END)
  .compile();

// 用输入调用图并打印结果
console.log(await graph.invoke({ question: "hi" }));
{ answer: 'bye' }请注意,invoke 的输出只包含输出 schema。
在节点之间传递私有状态
在某些情况下,你可能希望节点之间交换对中间逻辑至关重要但不属于图主 schema 的信息。这些私有数据与图的整体输入/输出无关,只应在某些节点之间共享。
下面,我们将创建一个由三个节点(node_1、node_2 和 node_3)组成的示例顺序图,其中私有数据在前两步(node_1 和 node_2)之间传递,而第三步(node_3)只能访问公开的整体状态。
python
from langgraph.graph import StateGraph, START, END
from typing_extensions import TypedDict

# 图的整体状态(这是跨节点共享的公共状态)
class OverallState(TypedDict):
    a: str

# node_1 的输出包含不属于整体状态的私有数据
class Node1Output(TypedDict):
    private_data: str

# 私有数据只在 node_1 和 node_2 之间共享
def node_1(state: OverallState) -> Node1Output:
    output = {"private_data": "set by node_1"}
    print(f"Entered node `node_1`:\n\tInput: {state}.\n\tReturned: {output}")
    return output

# node_2 的输入只请求 node_1 之后可用的私有数据
class Node2Input(TypedDict):
    private_data: str

def node_2(state: Node2Input) -> OverallState:
    output = {"a": "set by node_2"}
    print(f"Entered node `node_2`:\n\tInput: {state}.\n\tReturned: {output}")
    return output

# node_3 只能访问整体状态(无法访问来自 node_1 的私有数据)
def node_3(state: OverallState) -> OverallState:
    output = {"a": "set by node_3"}
    print(f"Entered node `node_3`:\n\tInput: {state}.\n\tReturned: {output}")
    return output

# 按顺序连接节点
# node_2 接受来自 node_1 的私有数据,而
# node_3 看不到这些私有数据。
builder = StateGraph(OverallState).add_sequence([node_1, node_2, node_3])
builder.add_edge(START, "node_1")
graph = builder.compile()

# 使用初始状态调用图
response = graph.invoke(
    {
        "a": "set at start",
    }
)

print()
print(f"Output of graph invocation: {response}")
Entered node `node_1`:
Input: {'a': 'set at start'}.
Returned: {'private_data': 'set by node_1'}
Entered node `node_2`:
Input: {'private_data': 'set by node_1'}.
Returned: {'a': 'set by node_2'}
Entered node `node_3`:
Input: {'a': 'set by node_2'}.
Returned: {'a': 'set by node_3'}
Output of graph invocation: {'a': 'set by node_3'}typescript
import { StateGraph, StateSchema, GraphNode, START, END } from "@langchain/langgraph";
import * as z from "zod";

// 图的整体状态(这是跨节点共享的公共状态)
const OverallState = new StateSchema({
  a: z.string(),
});

// node1 的输出包含不属于整体状态的私有数据
const Node1Output = new StateSchema({
  privateData: z.string(),
});

// node2 的输入只请求 node1 之后可用的私有数据
const Node2Input = new StateSchema({
  privateData: z.string(),
});

// 私有数据只在 node1 和 node2 之间共享
const node1: GraphNode<typeof OverallState> = (state) => {
  const output = { privateData: "set by node1" };
  console.log(`Entered node 'node1':\n\tInput: ${JSON.stringify(state)}.\n\tReturned: ${JSON.stringify(output)}`);
  return output;
};

const node2: GraphNode<typeof Node2Input> = (state) => {
  const output = { a: "set by node2" };
  console.log(`Entered node 'node2':\n\tInput: ${JSON.stringify(state)}.\n\tReturned: ${JSON.stringify(output)}`);
  return output;
};

// node3 只能访问整体状态(无法访问来自 node1 的私有数据)
const node3: GraphNode<typeof OverallState> = (state) => {
  const output = { a: "set by node3" };
  console.log(`Entered node 'node3':\n\tInput: ${JSON.stringify(state)}.\n\tReturned: ${JSON.stringify(output)}`);
  return output;
};

// 按顺序连接节点
// node2 接受来自 node1 的私有数据,而
// node3 看不到这些私有数据。
const graph = new StateGraph(OverallState)
  .addNode("node1", node1)
  .addNode("node2", node2, { input: Node2Input })
  .addNode("node3", node3)
  .addEdge(START, "node1")
  .addEdge("node1", "node2")
  .addEdge("node2", "node3")
  .addEdge("node3", END)
  .compile();

// 使用初始状态调用图
const response = await graph.invoke({ a: "set at start" });

console.log(`\nOutput of graph invocation: ${JSON.stringify(response)}`);
Entered node 'node1':
Input: {"a":"set at start"}.
Returned: {"privateData":"set by node1"}
Entered node 'node2':
Input: {"privateData":"set by node1"}.
Returned: {"a":"set by node2"}
Entered node 'node3':
Input: {"a":"set by node2"}.
Returned: {"a":"set by node3"}
Output of graph invocation: {"a":"set by node3"}将 pydantic 模型用于图状态
StateGraph 在初始化时接受一个 state_schema 参数,用于指定图中的节点可以访问和更新的状态的"形状"。
在我们的示例中,我们通常使用 Python 原生的 TypedDict 或 dataclass 作为 state_schema,但 state_schema 可以是任何类型。
在这里,我们将了解如何将 Pydantic BaseModel 用于 state_schema,以对输入添加运行时校验。
INFO
已知限制
- 目前,图的输出不会是 pydantic 模型的实例。
- 运行时校验只发生在图中第一个节点的输入上,不会发生在后续节点或输出上。
- pydantic 的校验错误跟踪不会显示错误发生在哪个节点中。
- Pydantic 的递归校验可能较慢。对于性能敏感的应用,你可能需要考虑改用
dataclass。
python
from langgraph.graph import StateGraph, START, END
from typing_extensions import TypedDict
from pydantic import BaseModel

# 图的整体状态(这是跨节点共享的公共状态)
class OverallState(BaseModel):
    a: str

def node(state: OverallState):
    return {"a": "goodbye"}

# 构建状态图
builder = StateGraph(OverallState)
builder.add_node(node)  # node_1 是第一个节点
builder.add_edge(START, "node")  # 从 node_1 开始图
builder.add_edge("node", END)  # 在 node_1 之后结束图
graph = builder.compile()

# 使用有效输入测试图
graph.invoke({"a": "hello"})使用无效输入调用图
python
try:
    graph.invoke({"a": 123})  # 应该是一个字符串
except Exception as e:
    print("An exception was raised because `a` is an integer rather than a string.")
    print(e)
An exception was raised because `a` is an integer rather than a string.
1 validation error for OverallState
a
Input should be a valid string [type=string_type, input_value=123, input_type=int]
For further information visit https://errors.pydantic.dev/2.9/v/string_type下面是 Pydantic 模型状态的更多特性:
序列化行为
当使用 Pydantic 模型作为状态 schema 时,了解序列化的工作方式非常重要,尤其是在以下情况:
- 将 Pydantic 对象作为输入传递
- 从图接收输出
- 使用嵌套的 Pydantic 模型
让我们看看这些行为在实际中的表现。
python
from langgraph.graph import StateGraph, START, END
from pydantic import BaseModel

class NestedModel(BaseModel):
    value: str

class ComplexState(BaseModel):
    text: str
    count: int
    nested: NestedModel

def process_node(state: ComplexState):
    # 节点接收到经过校验的 Pydantic 对象
    print(f"Input state type: {type(state)}")
    print(f"Nested type: {type(state.nested)}")
    # 返回字典形式的更新
    return {"text": state.text + " processed", "count": state.count + 1}

# 构建图
builder = StateGraph(ComplexState)
builder.add_node("process", process_node)
builder.add_edge(START, "process")
builder.add_edge("process", END)
graph = builder.compile()

# 创建用于输入的 Pydantic 实例
input_state = ComplexState(text="hello", count=0, nested=NestedModel(value="test"))
print(f"Input object type: {type(input_state)}")

# 使用 Pydantic 实例调用图
result = graph.invoke(input_state)
print(f"Output type: {type(result)}")
print(f"Output content: {result}")

# 如果需要,转换回 Pydantic 模型
output_model = ComplexState(**result)
print(f"Converted back to Pydantic: {type(output_model)}")
运行时类型强制转换
Pydantic 会对某些数据类型执行运行时类型强制转换。这可能很有帮助,但如果你不了解它,也可能导致意外行为。
python
from langgraph.graph import StateGraph, START, END
from pydantic import BaseModel

class CoercionExample(BaseModel):
    # Pydantic 会将数字字符串强制转换为整数
    number: int
    # Pydantic 会将字符串布尔值解析为布尔值
    flag: bool

def inspect_node(state: CoercionExample):
    print(f"number: {state.number} (type: {type(state.number)})")
    print(f"flag: {state.flag} (type: {type(state.flag)})")
    return {}

builder = StateGraph(CoercionExample)
builder.add_node("inspect", inspect_node)
builder.add_edge(START, "inspect")
builder.add_edge("inspect", END)
graph = builder.compile()

# 演示使用将被转换的字符串输入进行强制转换
result = graph.invoke({"number": "42", "flag": "true"})

# 这将抛出校验错误
try:
    graph.invoke({"number": "not-a-number", "flag": "true"})
except Exception as e:
    print(f"\nExpected validation error: {e}")
使用消息模型
在状态 schema 中使用 LangChain 消息类型时,序列化有一些重要的注意事项。当通过网络传输消息对象时,你应该使用 AnyMessage(而不是 BaseMessage)以确保正确的序列化/反序列化。
python
from langgraph.graph import StateGraph, START, END
from pydantic import BaseModel
from langchain.messages import HumanMessage, AIMessage, AnyMessage
from typing import List

class ChatState(BaseModel):
    messages: List[AnyMessage]
    context: str

def add_message(state: ChatState):
    return {"messages": state.messages + [AIMessage(content="Hello there!")]}

builder = StateGraph(ChatState)
builder.add_node("add_message", add_message)
builder.add_edge(START, "add_message")
builder.add_edge("add_message", END)
graph = builder.compile()

# 使用消息创建输入
initial_state = ChatState(
    messages=[HumanMessage(content="Hi")], context="Customer support chat"
)

result = graph.invoke(initial_state)
print(f"Output: {result}")

# 转换回 Pydantic 模型以查看消息类型
output_model = ChatState(**result)
for i, msg in enumerate(output_model.messages):
    print(f"Message {i}: {type(msg).__name__} - {msg.content}")
替代的状态定义
虽然 StateSchema 是定义状态的推荐方法,但 LangGraph 还支持其他几种方法。本节介绍所有可用的选项。
Channels API
Channels API 提供了对状态管理的底层控制。LangGraph 提供了几种内置的通道类型:
| 通道类型 | 行为 | 使用场景 |
|---|---|---|
LastValue | 存储最近的值 | 会被覆盖的简单字段 |
BinaryOperatorAggregate | 使用 reducer 函数组合值 | 累积值(计数器、列表) |
Topic | 将所有值收集到一个序列中 | 事件流、审计日志 |
EphemeralValue | 在超级步骤之间重置的值 | 临时计算状态 |
使用对象简写:
当你传入一个带有 reducer 和 default 的对象时,它会创建一个 BinaryOperatorAggregate 通道。传入 null 会创建一个 LastValue 通道:
typescript
import { BaseMessage } from "@langchain/core/messages";
import { StateGraph } from "@langchain/langgraph";

interface WorkflowState {
  messages: BaseMessage[];
  question: string;
  answer: string;
}

const workflow = new StateGraph<WorkflowState>({
  channels: {
    // BinaryOperatorAggregate:使用 reducer 组合值
    messages: {
      reducer: (current, update) => current.concat(update),
      default: () => [],
    },
    // LastValue:存储最近的值(null = 无 reducer)
    question: null,
    answer: null,
  },
});
直接使用通道类:
为了获得更多控制,你可以直接实例化通道类:
typescript
import { BaseMessage } from "@langchain/core/messages";
import { StateGraph, LastValue, BinaryOperatorAggregate, Topic } from "@langchain/langgraph";

interface WorkflowState {
  messages: BaseMessage[];
  question: string;
  events: string[];
}

const workflow = new StateGraph<WorkflowState>({
  channels: {
    messages: new BinaryOperatorAggregate<BaseMessage[]>(
      (current, update) => current.concat(update),
      () => []
    ),
    question: new LastValue<string>(),
    // Topic 收集执行期间推送的所有值
    events: new Topic<string>(),
  },
});
Annotation.Root
Annotation.Root 提供了一种使用 reducers 定义状态的声明式方式。它与 StateSchema 类似,但使用不同的语法:
typescript
import { BaseMessage } from "@langchain/core/messages";
import { Annotation, StateGraph, messagesStateReducer } from "@langchain/langgraph";

const State = Annotation.Root({
  messages: Annotation<BaseMessage[]>({
    reducer: messagesStateReducer,
    default: () => [],
  }),
  question: Annotation<string>(),
  count: Annotation<number>({
    reducer: (current, update) => current + update,
    default: () => 0,
  }),
});

const graph = new StateGraph(State);
使用 Zod v3 的 Zod 对象
使用 Zod v3 时,你可以用普通的 z.object() schema 定义状态。LangGraph 通过 .langgraph 插件扩展了 Zod v3,该插件提供了 .reducer() 和 .metadata() 方法:
typescript
import { z } from "zod/v3";
import { BaseMessage } from "@langchain/core/messages";
import { StateGraph, messagesStateReducer } from "@langchain/langgraph";

const State = z.object({
  // 使用 .langgraph.reducer() 附加 reducer 函数
  messages: z
    .array(z.custom<BaseMessage>())
    .default([])
    .langgraph.reducer(messagesStateReducer),
  // 简单字段可以直接使用(最后写入者获胜)
  question: z.string().optional(),
  answer: z.string().optional(),
  // 用于累积值的自定义 reducer
  count: z
    .number()
    .default(0)
    .langgraph.reducer((current, update) => current + update),
});

const graph = new StateGraph(State);
使用 Zod v4 的 Zod 对象
Zod v4 使用基于注册表的方法。使用 LangGraph 注册表将元数据附加到 schema 字段:
typescript
import * as z from "zod";
import { BaseMessage } from "@langchain/core/messages";
import { StateGraph, MessagesZodMeta, messagesStateReducer } from "@langchain/langgraph";
import { registry } from "@langchain/langgraph/zod";

const State = z.object({
  // 使用 LangGraph 注册表和 MessagesZodMeta 调用 .register()
  messages: z
    .array(z.custom<BaseMessage>())
    .default([])
    .register(registry, MessagesZodMeta),
  // 简单字段可以直接使用(最后写入者获胜)
  question: z.string().optional(),
  answer: z.string().optional(),
  // 通过注册表元数据定义自定义 reducer
  count: z
    .number()
    .default(0)
    .register(registry, { reducer: (current: number, update: number) => current + update }),
});

const graph = new StateGraph(State);
对比表
| 方法 | Reducers | 类型安全 | Zod 版本 | 推荐 |
|---|---|---|---|---|
StateSchema | ✅ 内置 | ✅ 完整 | v3 或 v4 | ✅ 是 |
| Channels API | ✅ 手动 | ⚠️ 部分 | N/A | 用于高级场景 |
Annotation.Root | ✅ 内置 | ✅ 完整 | N/A | 遗留 |
Zod v3 + .langgraph | ✅ 通过插件 | ✅ 完整 | 仅 v3 | 遗留 |
| Zod v4 + registry | ✅ 通过注册表 | ✅ 完整 | 仅 v4 | 遗留 |
添加运行时配置
有时你可能希望在调用图时能够对图进行配置。例如,你可能希望在运行时指定使用哪个 LLM 或系统提示词,而不让这些参数污染图状态。
要添加运行时配置:
- 为你的配置指定一个 schema
- 将配置添加到节点或条件边的函数签名中
- 将配置传入图中。
下面是一个简单示例:
python
from langgraph.graph import END, StateGraph, START
from langgraph.runtime import Runtime
from typing_extensions import TypedDict

# 1. 指定配置 schema
class ContextSchema(TypedDict):
    my_runtime_value: str

# 2. 定义一个在节点中访问配置的图
class State(TypedDict):
    my_state_value: str

def node(state: State, runtime: Runtime[ContextSchema]):
    if runtime.context["my_runtime_value"] == "a":
        return {"my_state_value": 1}
    elif runtime.context["my_runtime_value"] == "b":
        return {"my_state_value": 2}
    else:
        raise ValueError("Unknown values.")

builder = StateGraph(State, context_schema=ContextSchema)
builder.add_node(node)
builder.add_edge(START, "node")
builder.add_edge("node", END)

graph = builder.compile()

# 3. 在运行时传入配置:
print(graph.invoke({}, context={"my_runtime_value": "a"}))
print(graph.invoke({}, context={"my_runtime_value": "b"}))
{'my_state_value': 1}
{'my_state_value': 2}typescript
import { StateGraph, StateSchema, GraphNode, END, START } from "@langchain/langgraph";
import * as z from "zod";

// 1. 指定配置 schema
const ContextSchema = z.object({
  myRuntimeValue: z.string(),
});

// 2. 定义一个在节点中访问配置的图
const State = new StateSchema({
  myStateValue: z.number(),
});

const node: GraphNode<typeof State> = (state, runtime) => {
  if (runtime?.context?.myRuntimeValue === "a") {
    return { myStateValue: 1 };
  } else if (runtime?.context?.myRuntimeValue === "b") {
    return { myStateValue: 2 };
  } else {
    throw new Error("Unknown values.");
  }
};

const graph = new StateGraph(State, ContextSchema)
  .addNode("node", node)
  .addEdge(START, "node")
  .addEdge("node", END)
  .compile();

// 3. 在运行时传入配置:
console.log(await graph.invoke({}, { context: { myRuntimeValue: "a" } }));
console.log(await graph.invoke({}, { context: { myRuntimeValue: "b" } }));
{ myStateValue: 1 }
{ myStateValue: 2 }扩展示例:在运行时指定 LLM
下面我们演示一个实际示例,在运行时配置要使用的 LLM。我们将同时使用 OpenAI 和 Anthropic 模型。
python
from dataclasses import dataclass

from langchain.chat_models import init_chat_model
from langgraph.graph import MessagesState, END, StateGraph, START
from langgraph.runtime import Runtime
from typing_extensions import TypedDict

@dataclass
class ContextSchema:
    model_provider: str = "anthropic"

MODELS = {
    "anthropic": init_chat_model("claude-haiku-4-5-20251001"),
    "openai": init_chat_model("gpt-5.4-mini"),
}

def call_model(state: MessagesState, runtime: Runtime[ContextSchema]):
    model = MODELS[runtime.context.model_provider]
    response = model.invoke(state["messages"])
    return {"messages": [response]}

builder = StateGraph(MessagesState, context_schema=ContextSchema)
builder.add_node("model", call_model)
builder.add_edge(START, "model")
builder.add_edge("model", END)

graph = builder.compile()

# 使用
input_message = {"role": "user", "content": "hi"}
# 未配置时,使用默认值(Anthropic)
response_1 = graph.invoke({"messages": [input_message]}, context=ContextSchema())["messages"][-1]
# 或者,可以设置为 OpenAI
response_2 = graph.invoke({"messages": [input_message]}, context={"model_provider": "openai"})["messages"][-1]

print(response_1.response_metadata["model_name"])
print(response_2.response_metadata["model_name"])
claude-haiku-4-5-20251001
gpt-5.4-mini下面我们演示一个实际示例,在运行时配置要使用的 LLM。我们将同时使用 OpenAI 和 Anthropic 模型。
typescript
import { ChatOpenAI } from "@langchain/openai";
import { ChatAnthropic } from "@langchain/anthropic";
import { StateGraph, StateSchema, MessagesValue, GraphNode, START, END } from "@langchain/langgraph";
import * as z from "zod";

const ConfigSchema = z.object({
  modelProvider: z.string().default("anthropic"),
});

const State = new StateSchema({
  messages: MessagesValue,
});

const MODELS = {
  anthropic: new ChatAnthropic({ model: "claude-haiku-4-5-20251001" }),
  openai: new ChatOpenAI({ model: "gpt-5.4-mini" }),
};

const callModel: GraphNode<typeof State> = async (state, config) => {
  const modelProvider = config?.configurable?.modelProvider || "anthropic";
  const model = MODELS[modelProvider as keyof typeof MODELS];
  const response = await model.invoke(state.messages);
  return { messages: [response] };
};

const graph = new StateGraph(State, ConfigSchema)
  .addNode("model", callModel)
  .addEdge(START, "model")
  .addEdge("model", END)
  .compile();

// 使用
const inputMessage = { role: "user", content: "hi" };
// 未配置时,使用默认值(Anthropic)
const response1 = await graph.invoke({ messages: [inputMessage] });
// 或者,可以设置为 OpenAI
const response2 = await graph.invoke(
  { messages: [inputMessage] },
  { configurable: { modelProvider: "openai" } },
);

console.log(response1.messages.at(-1)?.response_metadata?.model);
console.log(response2.messages.at(-1)?.response_metadata?.model);
claude-haiku-4-5-20251001
gpt-5.4-mini扩展示例:在运行时指定模型和系统消息
下面我们演示一个实际示例,在运行时配置两个参数:要使用的 LLM 和系统消息。
python
from dataclasses import dataclass
from langchain.chat_models import init_chat_model
from langchain.messages import SystemMessage
from langgraph.graph import END, MessagesState, StateGraph, START
from langgraph.runtime import Runtime
from typing_extensions import TypedDict

@dataclass
class ContextSchema:
    model_provider: str = "anthropic"
    system_message: str | None = None

MODELS = {
    "anthropic": init_chat_model("claude-haiku-4-5-20251001"),
    "openai": init_chat_model("gpt-5.4-mini"),
}

def call_model(state: MessagesState, runtime: Runtime[ContextSchema]):
    model = MODELS[runtime.context.model_provider]
    messages = state["messages"]
    if (system_message := runtime.context.system_message):
        messages = [SystemMessage(system_message)] + messages
    response = model.invoke(messages)
    return {"messages": [response]}

builder = StateGraph(MessagesState, context_schema=ContextSchema)
builder.add_node("model", call_model)
builder.add_edge(START, "model")
builder.add_edge("model", END)

graph = builder.compile()

# 使用
input_message = {"role": "user", "content": "hi"}
response = graph.invoke({"messages": [input_message]}, context={"model_provider": "openai", "system_message": "Respond in Italian."})
for message in response["messages"]:
    message.pretty_print()
================================ Human Message ================================
hi
================================== Ai Message ==================================
Ciao! Come posso aiutarti oggi?下面我们演示一个实际示例,在运行时配置两个参数:要使用的 LLM 和系统消息。
typescript
import { ChatOpenAI } from "@langchain/openai";
import { ChatAnthropic } from "@langchain/anthropic";
import { SystemMessage } from "@langchain/core/messages";
import { StateGraph, StateSchema, MessagesValue, GraphNode, START, END } from "@langchain/langgraph";
import * as z from "zod";

const ConfigSchema = z.object({
  modelProvider: z.string().default("anthropic"),
  systemMessage: z.string().optional(),
});

const State = new StateSchema({
  messages: MessagesValue,
});

const MODELS = {
  anthropic: new ChatAnthropic({ model: "claude-haiku-4-5-20251001" }),
  openai: new ChatOpenAI({ model: "gpt-5.4-mini" }),
};

const callModel: GraphNode<typeof State> = async (state, config) => {
  const modelProvider = config?.configurable?.modelProvider || "anthropic";
  const systemMessage = config?.configurable?.systemMessage;

  const model = MODELS[modelProvider as keyof typeof MODELS];
  let messages = state.messages;

  if (systemMessage) {
    messages = [new SystemMessage(systemMessage), ...messages];
  }

  const response = await model.invoke(messages);
  return { messages: [response] };
};

const graph = new StateGraph(State, ConfigSchema)
  .addNode("model", callModel)
  .addEdge(START, "model")
  .addEdge("model", END)
  .compile();

// 使用
const inputMessage = { role: "user", content: "hi" };
const response = await graph.invoke(
  { messages: [inputMessage] },
  {
    configurable: {
      modelProvider: "openai",
      systemMessage: "Respond in Italian."
    }
  }
);

for (const message of response.messages) {
  console.log(`${message.getType()}: ${message.content}`);
}
human: hi
ai: Ciao! Come posso aiutarti oggi?添加重试策略
有很多使用场景你可能希望节点拥有自定义的重试策略,例如在调用 API、查询数据库或调用 LLM 等情况下。LangGraph 允许你为节点添加重试策略。
要配置重试策略,请将 retry_policy 参数传给 add_node。retry_policy 参数接受一个 RetryPolicy 命名元组对象。下面我们使用默认参数实例化一个 RetryPolicy 对象,并将其关联到一个节点:
python
from langgraph.types import RetryPolicy

builder.add_node(
    "node_name",
    node_function,
    retry_policy=RetryPolicy(),
)默认情况下,retry_on 参数使用 default_retry_on 函数,该函数会重试除以下异常之外的任何异常:
ValueErrorTypeErrorArithmeticErrorImportErrorLookupErrorNameErrorSyntaxErrorRuntimeErrorReferenceErrorStopIterationStopAsyncIterationOSError
此外,对于来自 requests 和 httpx 等流行 HTTP 请求库的异常,它只重试 5xx 状态码。
要配置重试策略,请将 retryPolicy 参数传给 addNode。retryPolicy 参数接受一个 RetryPolicy 对象。下面我们使用默认参数实例化一个 RetryPolicy 对象,并将其关联到一个节点:
typescript
import { RetryPolicy } from "@langchain/langgraph";

const graph = new StateGraph(State)
  .addNode("nodeName", nodeFunction, { retryPolicy: {} })
  .compile();
默认情况下,重试策略会重试除以下异常之外的任何异常:
TypeErrorSyntaxErrorReferenceError
扩展示例:自定义重试策略
考虑一个我们从 SQL 数据库读取数据的示例。下面我们为节点传入两种不同的重试策略:
python
import sqlite3
from typing_extensions import TypedDict
from langchain.chat_models import init_chat_model
from langgraph.graph import END, MessagesState, StateGraph, START
from langgraph.types import RetryPolicy
from langchain.messages import AIMessage

con = sqlite3.connect(":memory:")
model = init_chat_model("claude-haiku-4-5-20251001")

def query_database(state: MessagesState):
    cursor = con.cursor()
    cursor.execute("SELECT * FROM Artist LIMIT 10;")
    query_result = str(cursor.fetchall())
    return {"messages": [AIMessage(content=query_result)]}

def call_model(state: MessagesState):
    response = model.invoke(state["messages"])
    return {"messages": [response]}

# 定义一个新图
builder = StateGraph(MessagesState)
builder.add_node(
    "query_database",
    query_database,
    retry_policy=RetryPolicy(retry_on=sqlite3.OperationalError),
)
builder.add_node("model", call_model, retry_policy=RetryPolicy(max_attempts=5))
builder.add_edge(START, "model")
builder.add_edge("model", "query_database")
builder.add_edge("query_database", END)
graph = builder.compile()
考虑一个我们从 SQL 数据库读取数据的示例。下面我们为节点传入两种不同的重试策略:
typescript
import Database from "better-sqlite3";
import { ChatAnthropic } from "@langchain/anthropic";
import { StateGraph, StateSchema, MessagesValue, GraphNode, START, END } from "@langchain/langgraph";
import { AIMessage } from "@langchain/core/messages";

const State = new StateSchema({
  messages: MessagesValue,
});

// 创建一个内存数据库
const db: typeof Database.prototype = new Database(":memory:");

const model = new ChatAnthropic({ model: "claude-sonnet-4-6" });

const callModel: GraphNode<typeof State> = async (state) => {
  const response = await model.invoke(state.messages);
  return { messages: [response] };
};

const queryDatabase: GraphNode<typeof State> = async (state) => {
  const queryResult: string = JSON.stringify(
    db.prepare("SELECT * FROM Artist LIMIT 10;").all(),
  );

  return { messages: [new AIMessage({ content: "queryResult" })] };
};

const workflow = new StateGraph(State)
  // 定义我们将循环执行的两个节点
  .addNode("call_model", callModel, { retryPolicy: { maxAttempts: 5 } })
  .addNode("query_database", queryDatabase, {
    retryPolicy: {
      retryOn: (e: any): boolean => {
        if (e instanceof Database.SqliteError) {
          // 重试 "SQLITE_BUSY" 错误
          return e.code === "SQLITE_BUSY";
        }
        return false; // 其他错误不重试
      },
    },
  })
  .addEdge(START, "call_model")
  .addEdge("call_model", "query_database")
  .addEdge("query_database", END);

const graph = workflow.compile();
设置节点超时
将 timeout 参数与 add_node 一起使用,以限制单个异步节点调用可以运行的时间。以秒或 datetime.timedelta 的形式提供超时。
python
import asyncio
from typing_extensions import TypedDict

from langgraph.errors import NodeTimeoutError
from langgraph.graph import END, START, StateGraph

class State(TypedDict):
    value: str

async def call_model(state: State) -> State:
    await asyncio.sleep(2)
    return {"value": "done"}

builder = StateGraph(State)
builder.add_node("model", call_model, timeout=1.0)
builder.add_edge(START, "model")
builder.add_edge("model", END)
graph = builder.compile()

try:
    await graph.ainvoke({"value": "start"})
except NodeTimeoutError:
    print("Node timed out")
节点超时仅支持异步节点。如果你在同步节点上设置 timeout,LangGraph 会在编译图时抛出错误,因为同步 Python 执行无法在进程内安全地取消。
当节点超过其超时时,LangGraph 会抛出 NodeTimeoutError,它是 Python 内置 TimeoutError 的子类。如果节点有一个重试 TimeoutError 或 NodeTimeoutError 的 retry_policy,则超时的尝试会被重试。超时独立适用于每次尝试,因此每次重试都会重置计时器。
超时的尝试不会提交其缓冲的写入。这可以防止状态更新或子任务调度在超时边界之后泄漏出去。
配置节点超时
add_node 上的 timeout= 参数限制单个异步节点尝试可以运行的时间。传入数字(秒)、timedelta 或 TimeoutPolicy 以对运行和空闲超时进行更精细的控制。当超过限制时,LangGraph 抛出 NodeTimeoutError,并由重试策略决定是否重试。
INFO
每节点超时要求 langgraph>=1.2。
python
from langgraph.types import TimeoutPolicy

builder.add_node(
    "call_model",
    call_model,
    timeout=TimeoutPolicy(run_timeout=120, idle_timeout=30),
)
完整的超时生命周期、空闲超时刷新来源以及 runtime.heartbeat() 请参阅容错。
处理节点错误
add_node 上的 error_handler= 参数注册一个函数,该函数在节点失败且所有重试都耗尽后运行。处理器接收当前状态和带有失败上下文的类型化 NodeError,并可以通过 Command 路由到恢复分支:
INFO
节点级错误处理器要求 langgraph>=1.2。
python
from langgraph.errors import NodeError
from langgraph.types import Command, RetryPolicy

def payment_error_handler(state: State, error: NodeError) -> Command:
    return Command(
        update={"status": f"compensated: {error.error}"},
        goto="finalize",
    )

builder.add_node(
    "charge_payment",
    charge_payment,
    retry_policy=RetryPolicy(max_attempts=3, retry_on=ConnectionError),
    error_handler=payment_error_handler,
)
补偿模式和 Command 路由请参阅容错。
设置图级节点默认值
INFO
要求 langgraph>=1.2。
使用 set_node_defaults 为图中每个节点一次性设置 retry_policy、timeout、cache_policy 或 error_handler,而不是在每次 add_node 调用中重复设置。每节点的值始终优先,默认值在 StateGraph.compile 时应用:
python
from langgraph.types import RetryPolicy, TimeoutPolicy

graph = (
    StateGraph(State)
    .set_node_defaults(
        retry_policy=RetryPolicy(max_attempts=3),
        timeout=TimeoutPolicy(run_timeout=30),
        error_handler=fallback_handler,
    )
    .add_node("a", node_a)
    .add_node("b", node_b, retry_policy=RetryPolicy(max_attempts=5))  # 覆盖默认值
    .add_edge(START, "a")
    .compile()
)
retry_policy 和 timeout 默认值适用于每个节点,包括错误处理器节点。cache_policy 和 error_handler 默认值仅适用于常规节点——处理器永远不会捕获自身,并且缓存处理器结果是不安全的。默认值不会被子图继承。
完整的优先级规则和适用性表请参阅容错。
在节点内访问执行信息
你可以通过 runtime.execution_info 访问执行标识和重试信息。这提供了线程、运行和检查点标识符以及重试状态,而无需直接读取 config。
| 属性 | 类型 | 说明 |
|---|---|---|
thread_id | str | None | 当前执行的线程 ID。没有检查点时返回 None。 |
run_id | str | None | 当前执行的运行 ID。config 中未提供时返回 None。 |
checkpoint_id | str | 当前执行的检查点 ID。 |
checkpoint_ns | str | 当前执行的检查点命名空间。 |
task_id | str | 当前执行的任务 ID。 |
node_attempt | int | 当前执行的尝试次数(从 1 开始)。第一次尝试为 1,第一次重试为 2,以此类推。 |
node_first_attempt_time | float | None | 第一次尝试开始的 Unix 时间戳(秒)。在重试之间保持不变。 |
访问线程和运行 ID
在节点内使用 execution_info 访问线程 ID、运行 ID 和其他标识字段:
python
from langgraph.graph import StateGraph, START, END
from langgraph.runtime import Runtime
from typing_extensions import TypedDict

class State(TypedDict):
    result: str

def my_node(state: State, runtime: Runtime):
    info = runtime.execution_info
    print(f"Thread: {info.thread_id}, Run: {info.run_id}")
    return {"result": "done"}

builder = StateGraph(State)
builder.add_node("my_node", my_node)
builder.add_edge(START, "my_node")
builder.add_edge("my_node", END)
graph = builder.compile()
根据重试状态调整行为
当节点有重试策略时,使用 execution_info 检查当前的尝试次数,并在第一次尝试失败后切换到回退方案:
python
from langgraph.graph import StateGraph, START, END
from langgraph.runtime import Runtime
from langgraph.types import RetryPolicy
from typing_extensions import TypedDict

class State(TypedDict):
    result: str

def my_node(state: State, runtime: Runtime):
    info = runtime.execution_info
    if info.node_attempt > 1:
        # 在重试时使用回退方案
        return {"result": call_fallback_api()}
    return {"result": call_primary_api()}

builder = StateGraph(State)
builder.add_node("my_node", my_node, retry_policy=RetryPolicy(max_attempts=3))
builder.add_edge(START, "my_node")
builder.add_edge("my_node", END)
graph = builder.compile()即使没有重试策略,execution_info 也可在 Runtime 对象上使用——node_attempt 默认为 1,node_first_attempt_time 设置为节点开始执行的时间。
在节点内访问服务器信息
当你的图在 LangGraph Server 上运行时,你可以通过 runtime.server_info 访问服务器特定的元数据。这提供了助手 ID、图 ID 和已认证用户,而无需直接读取 config 元数据或 configurable 键。
| 属性 | 类型 | 说明 |
|---|---|---|
assistant_id | str | 当前部署的助手 ID。 |
graph_id | str | 当前部署的图 ID。 |
user | BaseUser | None | 已认证用户,如果配置了自定义认证。 |
python
from langgraph.graph import StateGraph, START, END
from langgraph.runtime import Runtime
from typing_extensions import TypedDict

class State(TypedDict):
    result: str

def my_node(state: State, runtime: Runtime):
    server = runtime.server_info
    if server is not None:
        print(f"Assistant: {server.assistant_id}, Graph: {server.graph_id}")
        if server.user is not None:
            print(f"User: {server.user.identity}")
    return {"result": "done"}

builder = StateGraph(State)
builder.add_node("my_node", my_node)
builder.add_edge(START, "my_node")
builder.add_edge("my_node", END)
graph = builder.compile()
当图未在 LangGraph Server 上运行时(例如在本地开发或测试期间),server_info 为 None。
INFO
runtime.execution_info 和 runtime.server_info 要求 deepagents>=0.5.0(或 langgraph>=1.1.5)。
在节点内访问 drain 状态
当请求了优雅关闭时,runtime.drain_requested 为 True。在节点内读取该值,以便在下一个超级步骤边界之前跳过昂贵的工作:
python
from langgraph.runtime import Runtime

def my_node(state: State, runtime: Runtime) -> State:
    if runtime.drain_requested:
        return {"status": "skipped", "reason": runtime.drain_reason}
return {"status": do_work()}| 属性 | 类型 | 说明 |
|---|---|---|
drain_requested | bool | 如果已为此运行调用 RunControl.request_drain(),则为 True。 |
drain_reason | str | None | 传给 request_drain() 的原因字符串,如果未请求 drain,则为 None。 |
INFO
要求 langgraph>=1.2。完整的 RunControl API 请参阅优雅关闭。
在节点内访问执行信息
你可以通过 runtime.executionInfo 访问执行标识和重试信息。这提供了线程、运行和检查点标识符以及重试状态,而无需直接读取 config。
| 属性 | 类型 | 说明 |
|---|---|---|
threadId | string | undefined | 当前执行的线程 ID。 |
runId | string | undefined | 当前执行的运行 ID。 |
checkpointId | string | 当前执行的检查点 ID。 |
checkpointNs | string | 当前执行的检查点命名空间。 |
taskId | string | 当前执行的任务 ID。 |
nodeAttempt | number | 当前执行的尝试次数(从 1 开始)。 |
nodeFirstAttemptTime | number | undefined | 第一次尝试开始的 Unix 时间戳(秒)。在重试之间保持不变。 |
访问线程和运行 ID
在节点内使用 executionInfo 访问线程 ID、运行 ID 和其他标识字段:
ts
import { StateGraph, StateSchema, START, END } from "@langchain/langgraph";
import * as z from "zod";

const State = new StateSchema({
  result: z.string(),
});

const myNode: GraphNode<typeof State> = async (state, runtime) => {
  const info = runtime.executionInfo;
  console.log(`Thread: ${info.threadId}, Run: ${info.runId}`);
  return { result: "done" };
};

const graph = new StateGraph(State)
  .addNode("my_node", myNode)
  .addEdge(START, "my_node")
  .addEdge("my_node", END)
  .compile();
根据重试状态调整行为
当节点有重试策略时,使用 executionInfo 检查当前的尝试次数,并在第一次尝试失败后切换到回退方案:
ts
import { StateGraph, StateSchema, START, END } from "@langchain/langgraph";
import * as z from "zod";

const State = new StateSchema({
  result: z.string(),
});

const myNode: GraphNode<typeof State> = async (state, runtime) => {
  const info = runtime.executionInfo;
  if (info.nodeAttempt > 1) {
    // 在重试时使用回退方案
    return { result: await callFallbackApi() };
  }
  return { result: await callPrimaryApi() };
};

const graph = new StateGraph(State)
  .addNode("my_node", myNode, { retryPolicy: { maxAttempts: 3 } })
  .addEdge(START, "my_node")
  .addEdge("my_node", END)
.compile();即使没有重试策略,executionInfo 也可在 Runtime 对象上使用——nodeAttempt 默认为 1,nodeFirstAttemptTime 设置为节点开始执行的时间。
在节点内访问服务器信息
当你的图在 LangGraph Server 上运行时,你可以通过 runtime.serverInfo 访问服务器特定的元数据。
| 属性 | 类型 | 说明 |
|---|---|---|
assistantId | string | 当前部署的助手 ID。 |
graphId | string | 当前部署的图 ID。 |
user | BaseUser | null | 已认证用户,如果配置了自定义认证。 |
ts
const myNode: GraphNode<typeof State> = async (state, runtime) => {
  const server = runtime.serverInfo;
  if (server != null) {
    console.log(`Assistant: ${server.assistantId}, Graph: ${server.graphId}`);
    if (server.user != null) {
      console.log(`User: ${server.user.identity}`);
    }
  }
  return { result: "done" };
};
当图未在 LangGraph Server 上运行时,serverInfo 为 null。
INFO
runtime.executionInfo 和 runtime.serverInfo 要求 deepagents>=1.9.0(或 @langchain/langgraph>=1.2.8)。
添加节点缓存
节点缓存在你希望避免重复操作的情况下非常有用,例如在执行某些昂贵操作(无论是时间还是成本方面)时。LangGraph 允许你为图中的节点添加个性化的缓存策略。
要配置缓存策略,请将 cache_policy 参数传给 add_node 函数。在下面的示例中,实例化了一个 CachePolicy 对象,其存活时间为 120 秒,并使用默认的 key_func 生成器。然后它被关联到一个节点:
python
from langgraph.types import CachePolicy

builder.add_node(
    "node_name",
    node_function,
    cache_policy=CachePolicy(ttl=120),
)
然后,要为图启用节点级缓存,请在编译图时设置 cache 参数。下面的示例使用 InMemoryCache 来设置一个带内存缓存的图,但 SqliteCache 也是可用的。
python
from langgraph.cache.memory import InMemoryCache

graph = builder.compile(cache=InMemoryCache())
创建步骤序列
INFO
先决条件 本指南假定你熟悉上面关于状态的部分。
在这里,我们演示如何构建一个简单的步骤序列。我们将展示:
- 如何构建顺序图
- 构建类似图的内置简写方式。
要添加节点序列,我们使用图的 add_node 和 add_edge 方法:graph:
python
from langgraph.graph import START, StateGraph

builder = StateGraph(State)

# 添加节点
builder.add_node(step_1)
builder.add_node(step_2)
builder.add_node(step_3)

# 添加边
builder.add_edge(START, "step_1")
builder.add_edge("step_1", "step_2")
builder.add_edge("step_2", "step_3")
我们也可以使用内置的简写方式 .add_sequence:
python
builder = StateGraph(State).add_sequence([step_1, step_2, step_3])
builder.add_edge(START, "step_1")
要添加节点序列,我们使用图的 .addNode 和 .addEdge 方法:graph:
typescript
import { START, StateGraph } from "@langchain/langgraph";

const builder = new StateGraph(State)
  .addNode("step1", step1)
  .addNode("step2", step2)
  .addNode("step3", step3)
  .addEdge(START, "step1")
  .addEdge("step1", "step2")
  .addEdge("step2", "step3");
为什么要用 LangGraph 将应用程序步骤拆分为序列?
LangGraph 让为应用程序添加底层持久化层变得很容易。 这允许状态在节点执行之间被检查点持久化,因此你的 LangGraph 节点决定了:
它们还决定了执行步骤如何被流式输出,以及你的应用程序如何使用 Studio 被可视化和调试。
让我们演示一个端到端的示例。我们将创建三个步骤的序列:
- 在状态的一个键中填充一个值
- 更新相同的值
- 填充另一个不同的值
让我们先定义我们的状态。它决定了图的 schema,也可以指定如何应用更新。更多细节请参阅使用 reducers 处理状态更新。
在我们的例子中,我们只跟踪两个值:
python
from typing_extensions import TypedDict

class State(TypedDict):
    value_1: str
    value_2: int
typescript
import { StateSchema, GraphNode } from "@langchain/langgraph";
import * as z from "zod";

const State = new StateSchema({
  value1: z.string(),
  value2: z.number(),
});我们的节点只是读取图状态并对其进行更新的 Python 函数。此函数的第一个参数将始终是状态:
python
def step_1(state: State):
    return {"value_1": "a"}

def step_2(state: State):
    current_value_1 = state["value_1"]
    return {"value_1": f"{current_value_1} b"}

def step_3(state: State):
return {"value_2": 10}我们的节点只是读取图状态并对其进行更新的 TypeScript 函数。此函数的第一个参数将始终是状态:
typescript
const step1: GraphNode<typeof State> = (state) => {
  return { value1: "a" };
};

const step2: GraphNode<typeof State> = (state) => {
  const currentValue1 = state.value1;
  return { value1: `${currentValue1} b` };
};

const step3: GraphNode<typeof State> = (state) => {
  return { value2: 10 };
};
INFO
请注意,在向状态发出更新时,每个节点只需指定它希望更新的键的值。
默认情况下,这将覆盖相应键的值。你也可以使用 reducers 来控制更新的处理方式——例如,你可以改为将连续的更新追加到某个键。更多细节请参阅使用 reducers 处理状态更新。
最后,我们定义图。我们使用 StateGraph 来定义一个在该状态上运行的图。
然后我们将使用 add_node 和 add_edge 来填充我们的图并定义其控制流。
python
from langgraph.graph import START, StateGraph

builder = StateGraph(State)

# 添加节点
builder.add_node(step_1)
builder.add_node(step_2)
builder.add_node(step_3)

# 添加边
builder.add_edge(START, "step_1")
builder.add_edge("step_1", "step_2")
builder.add_edge("step_2", "step_3")
然后我们将使用 addNode 和 addEdge 来填充我们的图并定义其控制流。
typescript
import { START, StateGraph } from "@langchain/langgraph";

const graph = new StateGraph(State)
  .addNode("step1", step1)
  .addNode("step2", step2)
  .addNode("step3", step3)
  .addEdge(START, "step1")
  .addEdge("step1", "step2")
  .addEdge("step2", "step3")
  .compile();
TIP
指定自定义名称 你可以使用 add_node 为节点指定自定义名称:
python
builder.add_node("my_node", step_1)TIP
指定自定义名称 你可以使用 .addNode 为节点指定自定义名称:
typescript
const graph = new StateGraph(State)
.addNode("myNode", step1)
.compile();
请注意:
add_edge接受节点的名称,对于函数,默认是node.__name__。- 我们必须指定图的入口点。为此,我们添加一条带有 START 节点 的边。
- 当没有更多节点可执行时,图会停止。
接下来我们编译我们的图。这会对图的结构做一些基本检查(例如识别孤立节点)。如果我们通过检查点为应用程序添加持久化,也会在这里传入。
python
graph = builder.compile().addEdge接受节点的名称,对于函数,默认是node.name。- 我们必须指定图的入口点。为此,我们添加一条带有 START 节点 的边。
- 当没有更多节点可执行时,图会停止。
接下来我们编译我们的图。这会对图的结构做一些基本检查(例如识别孤立节点)。如果我们通过检查点为应用程序添加持久化,也会在这里传入。
LangGraph 提供了内置的图可视化工具。让我们检查一下我们的序列。可视化详情请参阅可视化你的图。
python
from IPython.display import Image, display

display(Image(graph.get_graph().draw_mermaid_png()))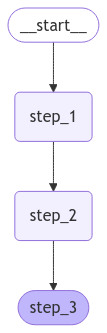
typescript
import * as fs from "node:fs/promises";

const drawableGraph = await graph.getGraphAsync();
const image = await drawableGraph.drawMermaidPng();
const imageBuffer = new Uint8Array(await image.arrayBuffer());

await fs.writeFile("graph.png", imageBuffer);
让我们继续进行一个简单的调用:
python
graph.invoke({"value_1": "c"}){'value_1': 'a b', 'value_2': 10}typescript
const result = await graph.invoke({ value1: "c" });
console.log(result);
{ value1: 'a b', value2: 10 }请注意:
- 我们通过为单个状态键提供一个值来启动调用。我们总是必须至少为一个键提供值。
- 我们传入的值被第一个节点覆盖了。
- 第二个节点更新了该值。
- 第三个节点填充了一个不同的值。
TIP
内置简写langgraph>=0.2.46 包含一个用于添加节点序列的内置简写方式 add_sequence。你可以按如下方式编译相同的图:
python
builder = StateGraph(State).add_sequence([step_1, step_2, step_3])
builder.add_edge(START, "step_1")

graph = builder.compile()

graph.invoke({"value_1": "c"})
创建分支
节点的并行执行对于加速整体图操作至关重要。LangGraph 原生支持节点的并行执行,这可以显著提升基于图的工作流的性能。这种并行化通过扇出(fan-out)和扇入(fan-in)机制实现,同时利用标准边和条件边。下面是一些示例,展示如何添加适合你的分支数据流。
并行运行图节点
在此示例中,我们从 节点 A 扇出到 B 和 C,然后扇入到 D。在我们的状态中,我们指定了 reducer 的 add 操作。这将组合或累积 State 中特定键的值,而不是简单地覆盖现有值。对于列表,这意味着将新列表与现有列表拼接。关于使用 reducers 更新状态的更多细节,请参阅上面关于状态 reducers的部分。
python
import operator
from typing import Annotated, Any
from typing_extensions import TypedDict
from langgraph.graph import StateGraph, START, END

class State(TypedDict):
    # operator.add reducer 使该列表只追加
    aggregate: Annotated[list, operator.add]

def a(state: State):
    print(f'Adding "A" to {state["aggregate"]}')
    return {"aggregate": ["A"]}

def b(state: State):
    print(f'Adding "B" to {state["aggregate"]}')
    return {"aggregate": ["B"]}

def c(state: State):
    print(f'Adding "C" to {state["aggregate"]}')
    return {"aggregate": ["C"]}

def d(state: State):
    print(f'Adding "D" to {state["aggregate"]}')
    return {"aggregate": ["D"]}

builder = StateGraph(State)
builder.add_node(a)
builder.add_node(b)
builder.add_node(c)
builder.add_node(d)
builder.add_edge(START, "a")
builder.add_edge("a", "b")
builder.add_edge("a", "c")
builder.add_edge("b", "d")
builder.add_edge("c", "d")
builder.add_edge("d", END)
graph = builder.compile()
typescript
import { StateGraph, StateSchema, ReducedValue, GraphNode, START, END } from "@langchain/langgraph";
import * as z from "zod";

const State = new StateSchema({
  // reducer 使该列表只追加
  aggregate: new ReducedValue(
    z.array(z.string()).default(() => []),
    { reducer: (x, y) => x.concat(y) }
  ),
});

const nodeA: GraphNode<typeof State> = (state) => {
  console.log(`Adding "A" to ${state.aggregate}`);
  return { aggregate: ["A"] };
};

const nodeB: GraphNode<typeof State> = (state) => {
  console.log(`Adding "B" to ${state.aggregate}`);
  return { aggregate: ["B"] };
};

const nodeC: GraphNode<typeof State> = (state) => {
  console.log(`Adding "C" to ${state.aggregate}`);
  return { aggregate: ["C"] };
};

const nodeD: GraphNode<typeof State> = (state) => {
  console.log(`Adding "D" to ${state.aggregate}`);
  return { aggregate: ["D"] };
};

const graph = new StateGraph(State)
  .addNode("a", nodeA)
  .addNode("b", nodeB)
  .addNode("c", nodeC)
  .addNode("d", nodeD)
  .addEdge(START, "a")
  .addEdge("a", "b")
  .addEdge("a", "c")
  .addEdge("b", "d")
  .addEdge("c", "d")
  .addEdge("d", END)
  .compile();
python
from IPython.display import Image, display

display(Image(graph.get_graph().draw_mermaid_png()))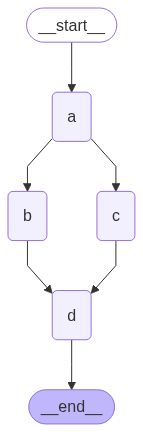
typescript
import * as fs from "node:fs/promises";

const drawableGraph = await graph.getGraphAsync();
const image = await drawableGraph.drawMermaidPng();
const imageBuffer = new Uint8Array(await image.arrayBuffer());

await fs.writeFile("graph.png", imageBuffer);
使用 reducer,你可以看到每个节点添加的值会被累积。
python
graph.invoke({"aggregate": []}, {"configurable": {"thread_id": "foo"}})Adding "A" to []
Adding "B" to ['A']
Adding "C" to ['A']
Adding "D" to ['A', 'B', 'C']typescript
const result = await graph.invoke({
  aggregate: [],
});
console.log(result);
Adding "A" to []
Adding "B" to ['A']
Adding "C" to ['A']
Adding "D" to ['A', 'B', 'C']
{ aggregate: ['A', 'B', 'C', 'D'] }INFO
在上面的示例中,节点 "b" 和 "c" 在同一个超级步骤中并发执行。因为它们处于同一步骤中,节点 "d" 在 "b" 和 "c" 都完成后才执行。
重要的是,来自并行超级步骤的更新可能无法保持一致的顺序。如果你需要来自并行超级步骤的、一致且预先确定的更新顺序,你应该将输出连同用于排序的值一起写入状态中的单独字段。
异常处理?
LangGraph 在超级步骤内执行节点,这意味着虽然并行分支是并行执行的,但整个超级步骤是事务性的。如果这些分支中的任何一个抛出异常,则没有任何更新会被应用到状态中(整个超级步骤出错)。
重要的是,使用检查点时,超级步骤中成功节点的结果会被保存,并且在恢复时不会重复执行。
如果你的节点容易出错(也许想处理不稳定的 API 调用),LangGraph 提供了两种方法来解决:
- 你可以在节点中编写常规的 Python 代码来捕获和处理异常。
- 你可以设置 retry_policy,指示图重试抛出特定类型异常的节点。只有失败的分支会被重试,所以你无需担心执行冗余的工作。
这两种方法结合起来,让你可以执行并行操作并完全控制异常处理。
TIP
设置最大并发 你可以通过在图调用时的配置中设置 max_concurrency 来控制并发任务的最大数量。
python
graph.invoke({"value_1": "c"}, {"configurable": {"max_concurrency": 10}})TIP
设置最大并发 你可以通过在图调用时的配置中设置 max_concurrency 来控制并发任务的最大数量。
typescript
const result = await graph.invoke({ value1: "c" }, {configurable: {max_concurrency: 10}});延迟节点执行
当你希望将节点的执行延迟到所有其他待处理任务完成时,延迟节点执行非常有用。这在分支长度不同时尤其相关,例如在 map-reduce 流程等工作流中很常见。
上面的示例展示了当每条路径只有一步时如何扇出和扇入。但如果一个分支有不止一步呢?让我们在 "b" 分支中添加一个节点 "b_2":
python
import operator
from typing import Annotated, Any
from typing_extensions import TypedDict
from langgraph.graph import StateGraph, START, END

class State(TypedDict):
    # operator.add reducer 使该列表只追加
    aggregate: Annotated[list, operator.add]

def a(state: State):
    print(f'Adding "A" to {state["aggregate"]}')
    return {"aggregate": ["A"]}

def b(state: State):
    print(f'Adding "B" to {state["aggregate"]}')
    return {"aggregate": ["B"]}

def b_2(state: State):
    print(f'Adding "B_2" to {state["aggregate"]}')
    return {"aggregate": ["B_2"]}

def c(state: State):
    print(f'Adding "C" to {state["aggregate"]}')
    return {"aggregate": ["C"]}

def d(state: State):
    print(f'Adding "D" to {state["aggregate"]}')
    return {"aggregate": ["D"]}

builder = StateGraph(State)
builder.add_node(a)
builder.add_node(b)
builder.add_node(b_2)
builder.add_node(c)
builder.add_node(d, defer=True)
builder.add_edge(START, "a")
builder.add_edge("a", "b")
builder.add_edge("a", "c")
builder.add_edge("b", "b_2")
builder.add_edge("b_2", "d")
builder.add_edge("c", "d")
builder.add_edge("d", END)
graph = builder.compile()
python
from IPython.display import Image, display

display(Image(graph.get_graph().draw_mermaid_png()))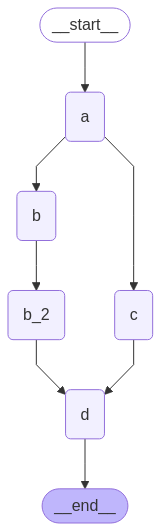
python
graph.invoke({"aggregate": []})Adding "A" to []
Adding "B" to ['A']
Adding "C" to ['A']
Adding "B_2" to ['A', 'B', 'C']
Adding "D" to ['A', 'B', 'C', 'B_2']在上面的示例中,节点 "b" 和 "c" 在同一个超级步骤中并发执行。我们在节点 d 上设置了 defer=True,因此它直到所有待处理任务都完成后才会执行。在本例中,这意味着 "d" 会等待,直到整个 "b" 分支完成后才执行。
条件分支
如果希望你的扇出在运行时根据状态而变化,可以使用 add_conditional_edges 利用图状态选择一个或多个路径。请参见下面的示例,其中节点 a 生成一个决定下一个节点的状态更新。
python
import operator
from typing import Annotated, Literal, Sequence
from typing_extensions import TypedDict
from langgraph.graph import StateGraph, START, END

class State(TypedDict):
    aggregate: Annotated[list, operator.add]
    # 向状态添加一个键。我们将设置该键来决定
    # 如何进行分支。
    which: str

def a(state: State):
    print(f'Adding "A" to {state["aggregate"]}')
    return {"aggregate": ["A"], "which": "c"}

def b(state: State):
    print(f'Adding "B" to {state["aggregate"]}')
    return {"aggregate": ["B"]}

def c(state: State):
    print(f'Adding "C" to {state["aggregate"]}')
    return {"aggregate": ["C"]}

builder = StateGraph(State)
builder.add_node(a)
builder.add_node(b)
builder.add_node(c)
builder.add_edge(START, "a")
builder.add_edge("b", END)
builder.add_edge("c", END)

def conditional_edge(state: State) -> Literal["b", "c"]:
    # 在此处填写使用状态的任意逻辑,
    # 以决定下一个节点
    return state["which"]

builder.add_conditional_edges("a", conditional_edge)

graph = builder.compile()
python
from IPython.display import Image, display

display(Image(graph.get_graph().draw_mermaid_png()))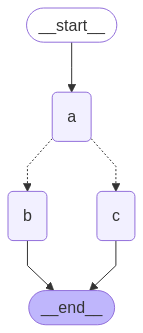
python
result = graph.invoke({"aggregate": []})
print(result)
Adding "A" to []
Adding "C" to ['A']
{'aggregate': ['A', 'C'], 'which': 'c'}如果希望你的扇出在运行时根据状态而变化,可以使用 addConditionalEdges 利用图状态选择一个或多个路径。请参见下面的示例,其中节点 a 生成一个决定下一个节点的状态更新。
typescript
import { StateGraph, StateSchema, ReducedValue, GraphNode, ConditionalEdgeRouter, START, END } from "@langchain/langgraph";
import * as z from "zod";

const State = new StateSchema({
  aggregate: new ReducedValue(
    z.array(z.string()).default(() => []),
    { reducer: (x, y) => x.concat(y) }
  ),
  // 向状态添加一个键。我们将设置该键来决定
  // 如何进行分支。
  which: z.string(),
});

const nodeA: GraphNode<typeof State> = (state) => {
  console.log(`Adding "A" to ${state.aggregate}`);
  return { aggregate: ["A"], which: "c" };
};

const nodeB: GraphNode<typeof State> = (state) => {
  console.log(`Adding "B" to ${state.aggregate}`);
  return { aggregate: ["B"] };
};

const nodeC: GraphNode<typeof State> = (state) => {
  console.log(`Adding "C" to ${state.aggregate}`);
  return { aggregate: ["C"] };
};

const conditionalEdge: ConditionalEdgeRouter<typeof State, "b" | "c"> = (state) => {
  // 在此处填写使用状态的任意逻辑,
  // 以决定下一个节点
  return state.which as "b" | "c";
};

const graph = new StateGraph(State)
  .addNode("a", nodeA)
  .addNode("b", nodeB)
  .addNode("c", nodeC)
  .addEdge(START, "a")
  .addEdge("b", END)
  .addEdge("c", END)
  .addConditionalEdges("a", conditionalEdge)
  .compile();
typescript
import * as fs from "node:fs/promises";

const drawableGraph = await graph.getGraphAsync();
const image = await drawableGraph.drawMermaidPng();
const imageBuffer = new Uint8Array(await image.arrayBuffer());

await fs.writeFile("graph.png", imageBuffer);
typescript
const result = await graph.invoke({ aggregate: [] });
console.log(result);
Adding "A" to []
Adding "C" to ['A']
{ aggregate: ['A', 'C'], which: 'c' }TIP
你的条件边可以路由到多个目标节点。例如:
python
def route_bc_or_cd(state: State) -> Sequence[str]:
    if state["which"] == "cd":
        return ["c", "d"]
    return ["b", "c"]
typescript
const routeBcOrCd: ConditionalEdgeRouter<typeof State, "b" | "c" | "d"> = (state) => {
  if (state.which === "cd") {
    return ["c", "d"];
  }
  return ["b", "c"];
};
Map-Reduce 与 send API
LangGraph 使用 Send API 支持 map-reduce 和其他高级分支模式。下面是一个如何使用它的示例:
python
from langgraph.graph import StateGraph, START, END
from langgraph.types import Send
from typing_extensions import TypedDict, Annotated
import operator

class OverallState(TypedDict):
    topic: str
    subjects: list[str]
    jokes: Annotated[list[str], operator.add]
    best_selected_joke: str

def generate_topics(state: OverallState):
    return {"subjects": ["lions", "elephants", "penguins"]}

def generate_joke(state: OverallState):
    joke_map = {
        "lions": "Why don't lions like fast food? Because they can't catch it!",
        "elephants": "Why don't elephants use computers? They're afraid of the mouse!",
        "penguins": "Why don't penguins like talking to strangers at parties? Because they find it hard to break the ice."
    }
    return {"jokes": [joke_map[state["subject"]]]}

def continue_to_jokes(state: OverallState):
    return [Send("generate_joke", {"subject": s}) for s in state["subjects"]]

def best_joke(state: OverallState):
    return {"best_selected_joke": "penguins"}

builder = StateGraph(OverallState)
builder.add_node("generate_topics", generate_topics)
builder.add_node("generate_joke", generate_joke)
builder.add_node("best_joke", best_joke)
builder.add_edge(START, "generate_topics")
builder.add_conditional_edges("generate_topics", continue_to_jokes, ["generate_joke"])
builder.add_edge("generate_joke", "best_joke")
builder.add_edge("best_joke", END)
graph = builder.compile()
python
from IPython.display import Image, display

display(Image(graph.get_graph().draw_mermaid_png()))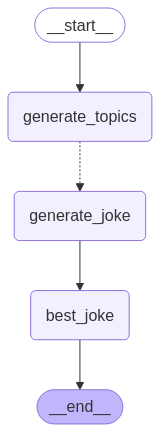
python
# 调用图:这里我们调用它来生成笑话列表
stream = graph.stream_events({"topic": "animals"}, version="v3")
for message in stream.messages:
    for token in message.text:
        print(token, end="", flush=True)
{'generate_topics': {'subjects': ['lions', 'elephants', 'penguins']}}
{'generate_joke': {'jokes': ["Why don't lions like fast food? Because they can't catch it!"]}}
{'generate_joke': {'jokes': ["Why don't elephants use computers? They're afraid of the mouse!"]}}
{'generate_joke': {'jokes': ['Why don't penguins like talking to strangers at parties? Because they find it hard to break the ice.']}}
{'best_joke': {'best_selected_joke': 'penguins'}}typescript
import { StateGraph, StateSchema, ReducedValue, GraphNode, START, END, Send } from "@langchain/langgraph";
import * as z from "zod";

const OverallState = new StateSchema({
  topic: z.string(),
  subjects: z.array(z.string()),
  jokes: new ReducedValue(
    z.array(z.string()).default(() => []),
    { reducer: (x, y) => x.concat(y) }
  ),
  bestSelectedJoke: z.string(),
});

const generateTopics: GraphNode<typeof OverallState> = (state) => {
  return { subjects: ["lions", "elephants", "penguins"] };
};

const generateJoke: GraphNode<typeof OverallState> = (state) => {
  const jokeMap: Record<string, string> = {
    lions: "Why don't lions like fast food? Because they can't catch it!",
    elephants: "Why don't elephants use computers? They're afraid of the mouse!",
    penguins: "Why don't penguins like talking to strangers at parties? Because they find it hard to break the ice."
  };
  return { jokes: [jokeMap[state.subject]] };
};

const continueToJokes: ConditionalEdgeRouter<typeof OverallState, "generateJoke"> = (state) => {
  return state.subjects.map((subject) => new Send("generateJoke", { subject }));
};

const bestJoke: GraphNode<typeof OverallState> = (state) => {
  return { bestSelectedJoke: "penguins" };
};

const graph = new StateGraph(OverallState)
  .addNode("generateTopics", generateTopics)
  .addNode("generateJoke", generateJoke)
  .addNode("bestJoke", bestJoke)
  .addEdge(START, "generateTopics")
  .addConditionalEdges("generateTopics", continueToJokes)
  .addEdge("generateJoke", "bestJoke")
  .addEdge("bestJoke", END)
  .compile();
typescript
import * as fs from "node:fs/promises";

const drawableGraph = await graph.getGraphAsync();
const image = await drawableGraph.drawMermaidPng();
const imageBuffer = new Uint8Array(await image.arrayBuffer());

await fs.writeFile("graph.png", imageBuffer);
typescript
// 调用图:这里我们调用它来生成笑话列表
const stream = await graph.streamEvents({ topic: "animals" }, { version: "v3" });
for await (const message of stream.messages) {
  for await (const token of message.text) {
    process.stdout.write(token);
  }
}
{ generateTopics: { subjects: [ 'lions', 'elephants', 'penguins' ] } }
{ generateJoke: { jokes: [ "Why don't lions like fast food? Because they can't catch it!" ] } }
{ generateJoke: { jokes: [ "Why don't elephants use computers? They're afraid of the mouse!" ] } }
{ generateJoke: { jokes: [ "Why don't penguins like talking to strangers at parties? Because they find it hard to break the ice." ] } }
{ bestJoke: { bestSelectedJoke: 'penguins' } }创建和控制循环
在创建带有循环的图时,我们需要一种终止执行的机制。最常用的方法是在达到某个终止条件时添加一条路由到 END 节点的条件边。
你也可以在调用图或对图进行流式输出时设置图的递归限制。递归限制设置了图在抛出错误之前允许执行的超级步骤数量。更多内容请阅读递归限制概念。
让我们考虑一个带有循环的简单图,以更好地理解这些机制的工作原理。
TIP
要想返回状态的最后一个值而不是收到递归限制错误,请参阅下一节。
在创建循环时,你可以包含一条指定终止条件的条件边:
python
builder = StateGraph(State)
builder.add_node(a)
builder.add_node(b)

def route(state: State) -> Literal["b", END]:
    if termination_condition(state):
        return END
    else:
        return "b"

builder.add_edge(START, "a")
builder.add_conditional_edges("a", route)
builder.add_edge("b", "a")
graph = builder.compile()
typescript
const route: ConditionalEdgeRouter<typeof State, "b"> = (state) => {
  if (terminationCondition(state)) {
    return END;
  } else {
    return "b";
  }
};

const graph = new StateGraph(State)
  .addNode("a", nodeA)
  .addNode("b", nodeB)
  .addEdge(START, "a")
  .addConditionalEdges("a", route)
  .addEdge("b", "a")
  .compile();
要控制递归限制,请在 config 中指定 "recursion_limit"。这将抛出 GraphRecursionError,你可以捕获并处理它:
python
from langgraph.errors import GraphRecursionError

try:
    graph.invoke(inputs, {"recursion_limit": 3})
except GraphRecursionError:
    print("Recursion Error")
要控制递归限制,请在 config 中指定 "recursionLimit"。这将抛出 GraphRecursionError,你可以捕获并处理它:
typescript
import { GraphRecursionError } from "@langchain/langgraph";

try {
  await graph.invoke(inputs, { recursionLimit: 3 });
} catch (error) {
  if (error instanceof GraphRecursionError) {
    console.log("Recursion Error");
  }
}
让我们定义一个带有简单循环的图。请注意,我们使用条件边来实现终止条件。
python
import operator
from typing import Annotated, Literal
from typing_extensions import TypedDict
from langgraph.graph import StateGraph, START, END

class State(TypedDict):
    # operator.add reducer 使该列表只追加
    aggregate: Annotated[list, operator.add]

def a(state: State):
    print(f'Node A sees {state["aggregate"]}')
    return {"aggregate": ["A"]}

def b(state: State):
    print(f'Node B sees {state["aggregate"]}')
    return {"aggregate": ["B"]}

# 定义节点
builder = StateGraph(State)
builder.add_node(a)
builder.add_node(b)

# 定义边
def route(state: State) -> Literal["b", END]:
    if len(state["aggregate"]) < 7:
        return "b"
    else:
        return END

builder.add_edge(START, "a")
builder.add_conditional_edges("a", route)
builder.add_edge("b", "a")
graph = builder.compile()
python
from IPython.display import Image, display

display(Image(graph.get_graph().draw_mermaid_png()))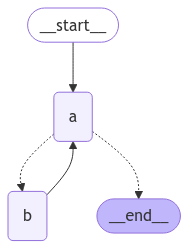
typescript
import { StateGraph, StateSchema, ReducedValue, GraphNode, ConditionalEdgeRouter, START, END } from "@langchain/langgraph";
import * as z from "zod";

const State = new StateSchema({
  // reducer 使该列表只追加
  aggregate: new ReducedValue(
    z.array(z.string()).default(() => []),
    { reducer: (x, y) => x.concat(y) }
  ),
});

const nodeA: GraphNode<typeof State> = (state) => {
  console.log(`Node A sees ${state.aggregate}`);
  return { aggregate: ["A"] };
};

const nodeB: GraphNode<typeof State> = (state) => {
  console.log(`Node B sees ${state.aggregate}`);
  return { aggregate: ["B"] };
};

// 定义边
const route: ConditionalEdgeRouter<typeof State, "b"> = (state) => {
  if (state.aggregate.length < 7) {
    return "b";
  } else {
    return END;
  }
};

const graph = new StateGraph(State)
  .addNode("a", nodeA)
  .addNode("b", nodeB)
  .addEdge(START, "a")
  .addConditionalEdges("a", route)
  .addEdge("b", "a")
  .compile();
typescript
import * as fs from "node:fs/promises";

const drawableGraph = await graph.getGraphAsync();
const image = await drawableGraph.drawMermaidPng();
const imageBuffer = new Uint8Array(await image.arrayBuffer());

await fs.writeFile("graph.png", imageBuffer);
这种架构类似于 ReAct 智能体,其中节点 "a" 是调用工具的模型,节点 "b" 表示工具。
在我们的 route 条件边中,我们指定在状态中的 "aggregate" 列表超过阈值长度后结束。
调用图后,我们看到我们在节点 "a" 和 "b" 之间交替,直到达到终止条件后终止。
python
graph.invoke({"aggregate": []})Node A sees []
Node B sees ['A']
Node A sees ['A', 'B']
Node B sees ['A', 'B', 'A']
Node A sees ['A', 'B', 'A', 'B']
Node B sees ['A', 'B', 'A', 'B', 'A']
Node A sees ['A', 'B', 'A', 'B', 'A', 'B']typescript
const result = await graph.invoke({ aggregate: [] });
console.log(result);
Node A sees []
Node B sees ['A']
Node A sees ['A', 'B']
Node B sees ['A', 'B', 'A']
Node A sees ['A', 'B', 'A', 'B']
Node B sees ['A', 'B', 'A', 'B', 'A']
Node A sees ['A', 'B', 'A', 'B', 'A', 'B']
{ aggregate: ['A', 'B', 'A', 'B', 'A', 'B', 'A'] }施加递归限制
在某些应用中,我们无法保证会达到给定的终止条件。在这些情况下,我们可以设置图的递归限制。这会在执行给定数量的超级步骤后抛出 GraphRecursionError。然后我们可以捕获并处理此异常:
python
from langgraph.errors import GraphRecursionError

try:
    graph.invoke({"aggregate": []}, {"recursion_limit": 4})
except GraphRecursionError:
    print("Recursion Error")
Node A sees []
Node B sees ['A']
Node C sees ['A', 'B']
Node D sees ['A', 'B']
Node A sees ['A', 'B', 'C', 'D']
Recursion Errortypescript
import { GraphRecursionError } from "@langchain/langgraph";

try {
  await graph.invoke({ aggregate: [] }, { recursionLimit: 4 });
} catch (error) {
  if (error instanceof GraphRecursionError) {
    console.log("Recursion Error");
  }
}
Node A sees []
Node B sees ['A']
Node A sees ['A', 'B']
Node B sees ['A', 'B', 'A']
Node A sees ['A', 'B', 'A', 'B']
Recursion Error扩展示例:在达到递归限制时返回状态
与其抛出 GraphRecursionError,我们可以向状态引入一个新键,用于跟踪达到递归限制之前剩余的步数。然后我们可以使用该键来决定是否应该结束运行。
LangGraph 实现了一个特殊的 RemainingSteps 注解。在底层,它创建了一个 ManagedValue 通道——一个只在我们图运行期间存在的状态通道。
python
import operator
from typing import Annotated, Literal
from typing_extensions import TypedDict
from langgraph.graph import StateGraph, START, END
from langgraph.managed.is_last_step import RemainingSteps

class State(TypedDict):
    aggregate: Annotated[list, operator.add]
    remaining_steps: RemainingSteps

def a(state: State):
    print(f'Node A sees {state["aggregate"]}')
    return {"aggregate": ["A"]}

def b(state: State):
    print(f'Node B sees {state["aggregate"]}')
    return {"aggregate": ["B"]}

# 定义节点
builder = StateGraph(State)
builder.add_node(a)
builder.add_node(b)

# 定义边
def route(state: State) -> Literal["b", END]:
    if state["remaining_steps"] <= 2:
        return END
    else:
        return "b"

builder.add_edge(START, "a")
builder.add_conditional_edges("a", route)
builder.add_edge("b", "a")
graph = builder.compile()

# 测试一下
result = graph.invoke({"aggregate": []}, {"recursion_limit": 4})
print(result)
Node A sees []
Node B sees ['A']
Node A sees ['A', 'B']
{'aggregate': ['A', 'B', 'A']}扩展示例:带分支的循环
为了更好地理解递归限制的工作原理,让我们考虑一个更复杂的示例。下面我们实现一个循环,但其中一个步骤扇出到两个节点:
python
import operator
from typing import Annotated, Literal
from typing_extensions import TypedDict
from langgraph.graph import StateGraph, START, END

class State(TypedDict):
    aggregate: Annotated[list, operator.add]

def a(state: State):
    print(f'Node A sees {state["aggregate"]}')
    return {"aggregate": ["A"]}

def b(state: State):
    print(f'Node B sees {state["aggregate"]}')
    return {"aggregate": ["B"]}

def c(state: State):
    print(f'Node C sees {state["aggregate"]}')
    return {"aggregate": ["C"]}

def d(state: State):
    print(f'Node D sees {state["aggregate"]}')
    return {"aggregate": ["D"]}

# 定义节点
builder = StateGraph(State)
builder.add_node(a)
builder.add_node(b)
builder.add_node(c)
builder.add_node(d)

# 定义边
def route(state: State) -> Literal["b", END]:
    if len(state["aggregate"]) < 7:
        return "b"
    else:
        return END

builder.add_edge(START, "a")
builder.add_conditional_edges("a", route)
builder.add_edge("b", "c")
builder.add_edge("b", "d")
builder.add_edge(["c", "d"], "a")
graph = builder.compile()
python
from IPython.display import Image, display

display(Image(graph.get_graph().draw_mermaid_png()))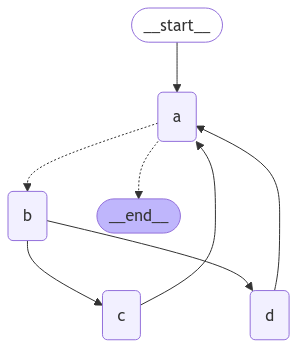
这个图看起来很复杂,但可以将其概念化为超级步骤的循环:
- 节点 A
- 节点 B
- 节点 C 和 D
- 节点 A
- ……
我们有一个包含四个超级步骤的循环,其中节点 C 和 D 并发执行。
像以前一样调用图,我们看到在达到终止条件之前,我们完成了两个完整的"圈":
python
result = graph.invoke({"aggregate": []})Node A sees []
Node B sees ['A']
Node D sees ['A', 'B']
Node C sees ['A', 'B']
Node A sees ['A', 'B', 'C', 'D']
Node B sees ['A', 'B', 'C', 'D', 'A']
Node D sees ['A', 'B', 'C', 'D', 'A', 'B']
Node C sees ['A', 'B', 'C', 'D', 'A', 'B']
Node A sees ['A', 'B', 'C', 'D', 'A', 'B', 'C', 'D']但是,如果我们将递归限制设置为四,我们只会完成一圈,因为每一圈有四个超级步骤:
python
from langgraph.errors import GraphRecursionError

try:
    result = graph.invoke({"aggregate": []}, {"recursion_limit": 4})
except GraphRecursionError:
    print("Recursion Error")
Node A sees []
Node B sees ['A']
Node C sees ['A', 'B']
Node D sees ['A', 'B']
Node A sees ['A', 'B', 'C', 'D']
Recursion Error异步
当并发运行 IO 密集型代码时(例如向对话模型提供商并发发送 API 请求),使用异步编程范式可以带来显著的性能提升。
要将图的 sync 实现转换为 async 实现,你需要:
- 更新
nodes,使用async def而不是def。 - 更新内部代码,适当使用
await。 - 根据需要,使用
.ainvoke或.astream调用图。
由于许多 LangChain 对象实现了 Runnable Protocol,该协议具有所有 sync 方法的 async 变体,因此将 sync 图升级为 async 图通常相当快。
请参见下面的示例。为了演示底层 LLM 的异步调用,我们将包含一个对话模型:
OpenAI
👉 Read the OpenAI chat model integration docs
bash
pip install -U "langchain[openai]"python
import os
from langchain.chat_models import init_chat_model

os.environ["OPENAI_API_KEY"] = "sk-..."

model = init_chat_model("gpt-5.5")
python
import os
from langchain_openai import ChatOpenAI

os.environ["OPENAI_API_KEY"] = "sk-..."

model = ChatOpenAI(model="gpt-5.5")
Anthropic
👉 Read the Anthropic chat model integration docs
bash
pip install -U "langchain[anthropic]"python
import os
from langchain.chat_models import init_chat_model

os.environ["ANTHROPIC_API_KEY"] = "sk-..."

model = init_chat_model("claude-sonnet-4-6")
python
import os
from langchain_anthropic import ChatAnthropic

os.environ["ANTHROPIC_API_KEY"] = "sk-..."

model = ChatAnthropic(model="claude-sonnet-4-6")
Azure
👉 Read the Azure chat model integration docs
bash
pip install -U "langchain[openai]"python
import os
from langchain.chat_models import init_chat_model

os.environ["AZURE_OPENAI_API_KEY"] = "..."
os.environ["AZURE_OPENAI_ENDPOINT"] = "..."
os.environ["OPENAI_API_VERSION"] = "2025-03-01-preview"

model = init_chat_model(
    "azure_openai:gpt-5.5",
    azure_deployment=os.environ["AZURE_OPENAI_DEPLOYMENT_NAME"],
)
python
import os
from langchain_openai import AzureChatOpenAI

os.environ["AZURE_OPENAI_API_KEY"] = "..."
os.environ["AZURE_OPENAI_ENDPOINT"] = "..."
os.environ["OPENAI_API_VERSION"] = "2025-03-01-preview"

model = AzureChatOpenAI(
    model="gpt-5.5",
    azure_deployment=os.environ["AZURE_OPENAI_DEPLOYMENT_NAME"]
)
Google Gemini
👉 Read the Google GenAI chat model integration docs
bash
pip install -U "langchain[google-genai]"python
import os
from langchain.chat_models import init_chat_model

os.environ["GOOGLE_API_KEY"] = "..."

model = init_chat_model("google_genai:gemini-2.5-flash-lite")
python
import os
from langchain_google_genai import ChatGoogleGenerativeAI

os.environ["GOOGLE_API_KEY"] = "..."

model = ChatGoogleGenerativeAI(model="gemini-2.5-flash-lite")
AWS Bedrock
👉 Read the AWS Bedrock chat model integration docs
bash
pip install -U "langchain[aws]"python
from langchain.chat_models import init_chat_model

# Follow the steps here to configure your credentials:
# https://docs.aws.amazon.com/bedrock/latest/userguide/getting-started.html

model = init_chat_model(
    "us.anthropic.claude-sonnet-4-6",
    model_provider="bedrock_converse",
)
python
from langchain_aws import ChatBedrock

model = ChatBedrock(model="us.anthropic.claude-sonnet-4-6")
HuggingFace
👉 Read the HuggingFace chat model integration docs
bash
pip install -U "langchain[huggingface]"python
import os
from langchain.chat_models import init_chat_model

os.environ["HUGGINGFACEHUB_API_TOKEN"] = "hf_..."

model = init_chat_model(
    "microsoft/Phi-3-mini-4k-instruct",
    model_provider="huggingface",
    temperature=0.7,
    max_tokens=1024,
)
python
import os
from langchain_huggingface import ChatHuggingFace, HuggingFaceEndpoint

os.environ["HUGGINGFACEHUB_API_TOKEN"] = "hf_..."

llm = HuggingFaceEndpoint(
    repo_id="microsoft/Phi-3-mini-4k-instruct",
    temperature=0.7,
    max_length=1024,
)
model = ChatHuggingFace(llm=llm)
OpenRouter
👉 Read the OpenRouter chat model integration docs
bash
pip install -U "langchain-openrouter"python
import os
from langchain.chat_models import init_chat_model

os.environ["OPENROUTER_API_KEY"] = "sk-..."

model = init_chat_model(
    "auto",
    model_provider="openrouter",
)
python
import os
from langchain_openrouter import ChatOpenRouter

os.environ["OPENROUTER_API_KEY"] = "sk-..."

model = ChatOpenRouter(model="auto")
python
from langchain.chat_models import init_chat_model
from langgraph.graph import MessagesState, StateGraph

async def node(state: MessagesState):
    new_message = await llm.ainvoke(state["messages"])
    return {"messages": [new_message]}

builder = StateGraph(MessagesState).add_node(node).set_entry_point("node")
graph = builder.compile()

input_message = {"role": "user", "content": "Hello"}
result = await graph.ainvoke({"messages": [input_message]})
TIP
异步流式输出 有关异步流式输出的示例,请参阅流式输出指南。
使用 Command 组合控制流和状态更新
将控制流(边)和状态更新(节点)组合起来可能非常有用。例如,你可能想在同一个节点中既执行状态更新又决定下一个要去的节点。LangGraph 提供了一种方法,通过从节点函数返回 Command 对象来实现:
python
def my_node(state: State) -> Command[Literal["my_other_node"]]:
    return Command(
        # 状态更新
        update={"foo": "bar"},
        # 控制流
        goto="my_other_node"
    )
typescript
import { Command } from "@langchain/langgraph";

const myNode = (state: State): Command => {
  return new Command({
    // 状态更新
    update: { foo: "bar" },
    // 控制流
    goto: "myOtherNode"
  });
};
下面我们展示一个端到端的示例。让我们创建一个包含 3 个节点的简单图:A、B 和 C。我们将首先执行节点 A,然后根据节点 A 的输出决定下一步是去节点 B 还是节点 C。
python
import random
from typing_extensions import TypedDict, Literal
from langgraph.graph import StateGraph, START
from langgraph.types import Command

# 定义图状态
class State(TypedDict):
    foo: str

# 定义节点

def node_a(state: State) -> Command[Literal["node_b", "node_c"]]:
    print("Called A")
    value = random.choice(["b", "c"])
    # 这是条件边函数的替代
    if value == "b":
        goto = "node_b"
    else:
        goto = "node_c"

    # 注意 Command 如何允许你同时更新图状态并路由到下一个节点
    return Command(
        # 这是状态更新
        update={"foo": value},
        # 这是边的替代
        goto=goto,
    )

def node_b(state: State):
    print("Called B")
    return {"foo": state["foo"] + "b"}

def node_c(state: State):
    print("Called C")
    return {"foo": state["foo"] + "c"}
我们现在可以用上述节点创建 StateGraph。请注意,图没有用于路由的条件边!这是因为控制流是通过 node_a 内部的 Command 定义的。
python
builder = StateGraph(State)
builder.add_edge(START, "node_a")
builder.add_node(node_a)
builder.add_node(node_b)
builder.add_node(node_c)
# 注意:节点 A、B 和 C 之间没有边!

graph = builder.compile()
WARNING
你可能已经注意到,我们使用 Command 作为返回类型注解,例如 Command[Literal["node_b", "node_c"]]。这对于图渲染是必要的,它告诉 LangGraph node_a 可以导航到 node_b 和 node_c。
python
from IPython.display import display, Image

display(Image(graph.get_graph().draw_mermaid_png()))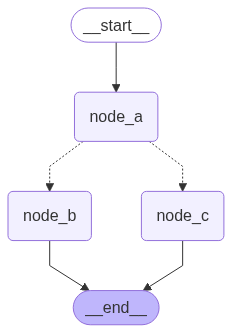
如果我们多次运行图,我们会看到它根据节点 A 中的随机选择走不同的路径(A -> B 或 A -> C)。
python
graph.invoke({"foo": ""})Called A
Called Ctypescript
import { StateGraph, StateSchema, GraphNode, Command, START } from "@langchain/langgraph";
import * as z from "zod";

// 定义图状态
const State = new StateSchema({
  foo: z.string(),
});

// 定义节点

const nodeA: GraphNode<typeof State, "nodeB" | "nodeC"> = (state) => {
  console.log("Called A");
  const value = Math.random() > 0.5 ? "b" : "c";
  // 这是条件边函数的替代
  const goto = value === "b" ? "nodeB" : "nodeC";

  // 注意 Command 如何允许你同时更新图状态并路由到下一个节点
  return new Command({
    // 这是状态更新
    update: { foo: value },
    // 这是边的替代
    goto,
  });
};

const nodeB: GraphNode<typeof State> = (state) => {
  console.log("Called B");
  return { foo: state.foo + "b" };
};

const nodeC: GraphNode<typeof State> = (state) => {
  console.log("Called C");
  return { foo: state.foo + "c" };
};
我们现在可以用上述节点创建 StateGraph。请注意,图没有用于路由的条件边!这是因为控制流是通过 nodeA 内部的 Command 定义的。
typescript
const graph = new StateGraph(State)
  .addNode("nodeA", nodeA, {
    ends: ["nodeB", "nodeC"],
  })
  .addNode("nodeB", nodeB)
  .addNode("nodeC", nodeC)
  .addEdge(START, "nodeA")
  .compile();
WARNING
你可能已经注意到,我们使用 ends 来指定 nodeA 可以导航到哪些节点。这对于图渲染是必要的,它告诉 LangGraph nodeA 可以导航到 nodeB 和 nodeC。
typescript
import * as fs from "node:fs/promises";

const drawableGraph = await graph.getGraphAsync();
const image = await drawableGraph.drawMermaidPng();
const imageBuffer = new Uint8Array(await image.arrayBuffer());

await fs.writeFile("graph.png", imageBuffer);
如果我们多次运行图,我们会看到它根据节点 A 中的随机选择走不同的路径(A -> B 或 A -> C)。
typescript
const result = await graph.invoke({ foo: "" });
console.log(result);
Called A
Called C
{ foo: 'cc' }导航到父图中的一个节点
如果你使用子图,你可能希望从子图内的节点导航到另一个子图(即父图中的另一个节点)。为此,你可以在 Command 中指定 graph=Command.PARENT:
python
def my_node(state: State) -> Command[Literal["other_subgraph"]]:
    return Command(
        update={"foo": "bar"},
        goto="other_subgraph",  # 其中 `other_subgraph` 是父图中的一个节点
        graph=Command.PARENT
    )
typescript
const myNode = (state: State): Command => {
  return new Command({
    update: { foo: "bar" },
    goto: "otherSubgraph",  // 其中 `otherSubgraph` 是父图中的一个节点
    graph: Command.PARENT
  });
};
让我们使用上面的示例来演示这一点。我们将把上面示例中的 nodeA 改成一个单节点图,并将其作为子图添加到父图中。
WARNING
使用 Command.PARENT 进行状态更新 当你从子图节点向父图节点发送更新时,如果更新的键同时存在于父图和子图的状态 schema 中,你必须在父图状态中为要更新的键定义一个reducer。请参见下面的示例。
python
import operator
from typing_extensions import Annotated

class State(TypedDict):
    # 注意:我们在这里定义了一个 reducer
    foo: Annotated[str, operator.add]

def node_a(state: State):
    print("Called A")
    value = random.choice(["a", "b"])
    # 这是条件边函数的替代
    if value == "a":
        goto = "node_b"
    else:
        goto = "node_c"

    # 注意 Command 如何允许你同时更新图状态并路由到下一个节点
    return Command(
        update={"foo": value},
        goto=goto,
        # 这告诉 LangGraph 导航到父图中的 node_b 或 node_c
        # 注意:这将导航到相对于子图最近的父图
        graph=Command.PARENT,
    )

subgraph = StateGraph(State).add_node(node_a).add_edge(START, "node_a").compile()

def node_b(state: State):
    print("Called B")
    # 注意:由于我们已经定义了 reducer,无需手动将
    # 新字符追加到现有的 'foo' 值中。相反,reducer 会自动追加这些
    # 字符(通过 operator.add)
    return {"foo": "b"}

def node_c(state: State):
    print("Called C")
    return {"foo": "c"}

builder = StateGraph(State)
builder.add_edge(START, "subgraph")
builder.add_node("subgraph", subgraph)
builder.add_node(node_b)
builder.add_node(node_c)

graph = builder.compile()
python
graph.invoke({"foo": ""})Called A
Called Ctypescript
import { StateGraph, StateSchema, ReducedValue, GraphNode, Command, START } from "@langchain/langgraph";
import * as z from "zod";

const State = new StateSchema({
  // 注意:我们在这里定义了一个 reducer
  foo: new ReducedValue(
    z.string().default(""),
    { reducer: (x, y) => x + y }
  ),
});

const nodeA: GraphNode<typeof State, "nodeB" | "nodeC"> = (state) => {
  console.log("Called A");
  const value = Math.random() > 0.5 ? "nodeB" : "nodeC";

  // 注意 Command 如何允许你同时更新图状态并路由到下一个节点
  return new Command({
    update: { foo: "a" },
    goto: value,
    // 这告诉 LangGraph 导航到父图中的 nodeB 或 nodeC
    // 注意:这将导航到相对于子图最近的父图
    graph: Command.PARENT,
  });
};

const subgraph = new StateGraph(State)
  .addNode("nodeA", nodeA, { ends: ["nodeB", "nodeC"] })
  .addEdge(START, "nodeA")
  .compile();

const nodeB: GraphNode<typeof State> = (state) => {
  console.log("Called B");
  // 注意:由于我们已经定义了 reducer,无需手动将
  // 新字符追加到现有的 'foo' 值中。相反,reducer 会自动追加这些
  // 字符
  return { foo: "b" };
};

const nodeC: GraphNode<typeof State> = (state) => {
  console.log("Called C");
  return { foo: "c" };
};

const graph = new StateGraph(State)
  .addNode("subgraph", subgraph, { ends: ["nodeB", "nodeC"] })
  .addNode("nodeB", nodeB)
  .addNode("nodeC", nodeC)
  .addEdge(START, "subgraph")
  .compile();
typescript
const result = await graph.invoke({ foo: "" });
console.log(result);
Called A
Called C
{ foo: 'ac' }在工具内部使用
一个常见的使用场景是从工具内部更新图状态。例如,在客户支持应用中,你可能希望在对话开始时根据客户的账号或 ID 查找客户信息。要从工具更新图状态,你可以从工具返回 Command(update={"my_custom_key": "foo", "messages": [...]}):
python
from langchain.tools import ToolRuntime

@tool
def lookup_user_info(runtime: ToolRuntime):
    """Use this to look up user information to better assist them with their questions."""
    user_info = get_user_info(runtime.server_info.user.identity)
    return Command(
        update={
            # 更新状态键
            "user_info": user_info,
            # 更新消息历史
            "messages": [ToolMessage("Successfully looked up user information", tool_call_id=runtime.tool_call_id)]
        }
    )
typescript
import { tool } from "@langchain/core/tools";
import { Command } from "@langchain/langgraph";
import * as z from "zod";

const lookupUserInfo = tool(
  async (input, runtime) => {
    const userId = runtime.serverInfo?.user?.identity;
    const userInfo = getUserInfo(userId);
    return new Command({
      update: {
        // 更新状态键
        userInfo: userInfo,
        // 更新消息历史
        messages: [{
          role: "tool",
          content: "Successfully looked up user information",
          tool_call_id: runtime.toolCall.id
        }]
      }
    });
  },
  {
    name: "lookupUserInfo",
    description: "Use this to look up user information to better assist them with their questions.",
    schema: z.object({}),
  }
);
WARNING
当从工具返回 Command 时,你必须在 Command.update 中包含 messages(或任何用于消息历史的状态键),并且 messages 中的消息列表必须包含一个 ToolMessage。这是保证生成的消息历史有效所必需的(LLM 提供商要求带有工具调用的 AI 消息之后必须跟有工具结果消息)。
如果你使用通过 Command 更新状态的工具,我们建议使用预构建的 ToolNode,它会自动处理返回 Command 对象的工具,并将它们传播到图状态。如果你正在编写一个调用工具的自定义节点,你需要手动将工具返回的 Command 对象作为节点的更新进行传播。
可视化你的图
在这里,我们演示如何可视化你创建的图。
你可以可视化任意 Graph,包括 StateGraph。
让我们画一些分形来玩玩 😃。
python
import random
from typing import Annotated, Literal
from typing_extensions import TypedDict
from langgraph.graph import StateGraph, START, END
from langgraph.graph.message import add_messages

class State(TypedDict):
    messages: Annotated[list, add_messages]

class MyNode:
    def __init__(self, name: str):
        self.name = name
    def __call__(self, state: State):
        return {"messages": [("assistant", f"Called node {self.name}")]}

def route(state) -> Literal["entry_node", END]:
    if len(state["messages"]) > 10:
        return END
    return "entry_node"

def add_fractal_nodes(builder, current_node, level, max_level):
    if level > max_level:
        return
    # 在此级别要创建的节点数
    num_nodes = random.randint(1, 3)  # 根据需要调整随机性
    for i in range(num_nodes):
        nm = ["A", "B", "C"][i]
        node_name = f"node_{current_node}_{nm}"
        builder.add_node(node_name, MyNode(node_name))
        builder.add_edge(current_node, node_name)
        # 递归添加更多节点
        r = random.random()
        if r > 0.2 and level + 1 < max_level:
            add_fractal_nodes(builder, node_name, level + 1, max_level)
        elif r > 0.05:
            builder.add_conditional_edges(node_name, route, node_name)
        else:
            # 结束
            builder.add_edge(node_name, END)

def build_fractal_graph(max_level: int):
    builder = StateGraph(State)
    entry_point = "entry_node"
    builder.add_node(entry_point, MyNode(entry_point))
    builder.add_edge(START, entry_point)
    add_fractal_nodes(builder, entry_point, 1, max_level)
    # 可选:如果需要,设置一个结束点
    builder.add_edge(entry_point, END)  # 或任何特定节点
    return builder.compile()

app = build_fractal_graph(3)
让我们创建一个简单的示例图来演示可视化。
typescript
import { StateGraph, StateSchema, MessagesValue, ReducedValue, GraphNode, ConditionalEdgeRouter, START, END } from "@langchain/langgraph";
import * as z from "zod";

const State = new StateSchema({
  messages: MessagesValue,
  value: new ReducedValue(
    z.number().default(0),
    { reducer: (x, y) => x + y }
  ),
});

const node1: GraphNode<typeof State> = (state) => {
  return { value: state.value + 1 };
};

const node2: GraphNode<typeof State> = (state) => {
  return { value: state.value * 2 };
};

const router: ConditionalEdgeRouter<typeof State, "node2"> = (state) => {
  if (state.value < 10) {
    return "node2";
  }
  return END;
};

const app = new StateGraph(State)
  .addNode("node1", node1)
  .addNode("node2", node2)
  .addEdge(START, "node1")
  .addConditionalEdges("node1", router)
  .addEdge("node2", "node1")
  .compile();
Mermaid
我们还可以将图类转换为 Mermaid 语法。
python
print(app.get_graph().draw_mermaid())%%{init: {'flowchart': {'curve': 'linear'}}}%%
graph TD;
tart__([__start__]):::first
ry_node(entry_node)
e_entry_node_A(node_entry_node_A)
e_entry_node_B(node_entry_node_B)
e_node_entry_node_B_A(node_node_entry_node_B_A)
e_node_entry_node_B_B(node_node_entry_node_B_B)
e_node_entry_node_B_C(node_node_entry_node_B_C)
nd__([__end__]):::last
tart__ --> entry_node;
ry_node --> __end__;
ry_node --> node_entry_node_A;
ry_node --> node_entry_node_B;
e_entry_node_B --> node_node_entry_node_B_A;
e_entry_node_B --> node_node_entry_node_B_B;
e_entry_node_B --> node_node_entry_node_B_C;
e_entry_node_A -.-> entry_node;
e_entry_node_A -.-> __end__;
e_node_entry_node_B_A -.-> entry_node;
e_node_entry_node_B_A -.-> __end__;
e_node_entry_node_B_B -.-> entry_node;
e_node_entry_node_B_B -.-> __end__;
e_node_entry_node_B_C -.-> entry_node;
e_node_entry_node_B_C -.-> __end__;
ssDef default fill:#f2f0ff,line-height:1.2
ssDef first fill-opacity:0
ssDef last fill:#bfb6fctypescript
const drawableGraph = await app.getGraphAsync();
console.log(drawableGraph.drawMermaid());
%%{init: {'flowchart': {'curve': 'linear'}}}%%
graph TD;
tart__([__start__]):::first
e1(node1)
e2(node2)
nd__([__end__]):::last
tart__ --> node1;
e1 -.-> node2;
e1 -.-> __end__;
e2 --> node1;
ssDef default fill:#f2f0ff,line-height:1.2
ssDef first fill-opacity:0
ssDef last fill:#bfb6fcPNG
如果愿意,我们可以将图渲染为 .png。这里我们可以使用三个选项:
- 使用 Mermaid.ink API(不需要额外的包)
- 使用 Mermaid + Pyppeteer(需要
pip install pyppeteer) - 使用 graphviz(需要
pip install graphviz)
使用 Mermaid.Ink
默认情况下,draw_mermaid_png() 使用 Mermaid.Ink 的 API 来生成图表。
python
from IPython.display import Image, display
from langchain_core.runnables.graph import CurveStyle, MermaidDrawMethod, NodeStyles

display(Image(app.get_graph().draw_mermaid_png()))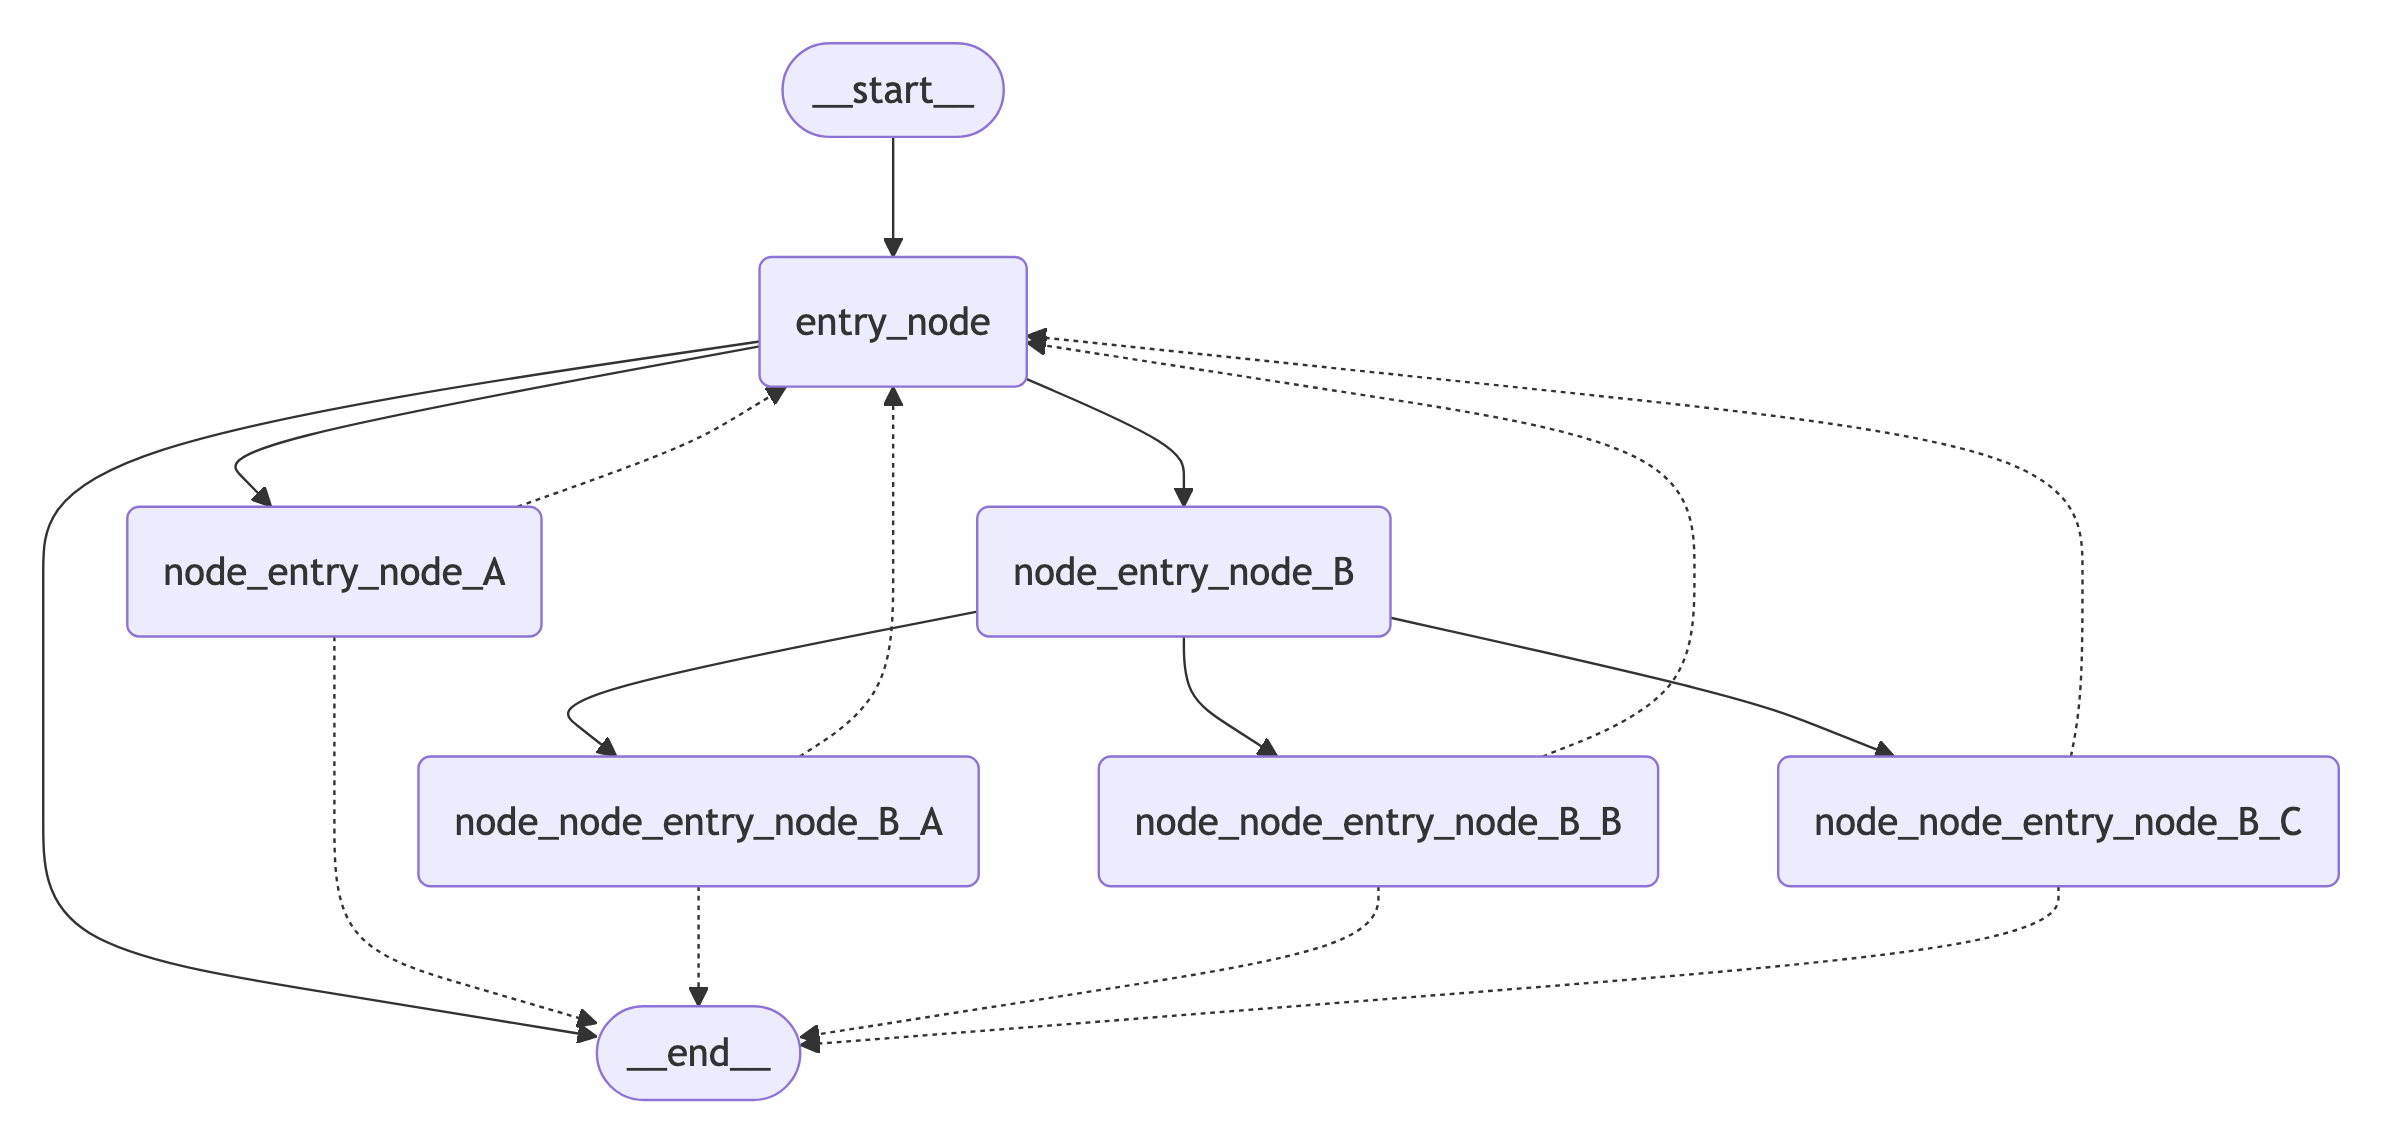
使用 Mermaid + Pyppeteer
python
import nest_asyncio

nest_asyncio.apply()  # Jupyter Notebook 运行异步函数所需

display(
    Image(
        app.get_graph().draw_mermaid_png(
            curve_style=CurveStyle.LINEAR,
            node_colors=NodeStyles(first="#ffdfba", last="#baffc9", default="#fad7de"),
            wrap_label_n_words=9,
            output_file_path=None,
            draw_method=MermaidDrawMethod.PYPPETEER,
            background_color="white",
            padding=10,
        )
    )
)
使用 Graphviz
python
try:
    display(Image(app.get_graph().draw_png()))
except ImportError:
    print(
        "You likely need to install dependencies for pygraphviz, see more here https://github.com/pygraphviz/pygraphviz/blob/main/INSTALL.txt"
    )
如果愿意,我们可以将图渲染为 .png。这将使用 Mermaid.ink API 来生成图表。
typescript
import * as fs from "node:fs/promises";

const drawableGraph = await app.getGraphAsync();
const image = await drawableGraph.drawMermaidPng();
const imageBuffer = new Uint8Array(await image.arrayBuffer());

await fs.writeFile("graph.png", imageBuffer);